By: Team SE-EDU Since: Jun 2016 Licence: MIT
- 1. Setting up
- 2. Design
- 3. Implementation
- 3.1. [Itinerary] Edit trip/day/event feature
- 3.2. [Itinerary] Delete Trip/Day/Event
- 3.3. [Expense] Expense Manager
- 3.4. [Currency] Currency
- 3.5. [Booking] Booking Manager
- 3.6. [Proposed] Undo/Redo feature
- 3.7. [Proposed] Data Encryption
- 3.8. [Diary] Photo Manager
- 3.9. [Diary] Diary Entry Text Editing
- 3.10. [Inventory] The Inventory List
- 3.11. Logging
- 3.12. Configuration
- 4. Documentation
- 5. Testing
- 6. Dev Ops
- Appendix A: Product Scope
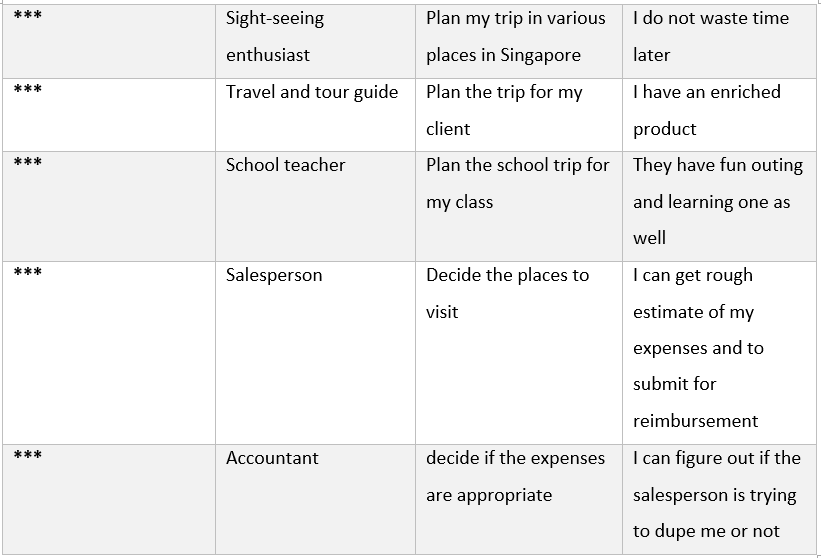
- Appendix B: User Stories
- Appendix C: Use Cases
- Appendix D: Non Functional Requirements
- Appendix E: Glossary
- Appendix F: Instructions for Manual Testing
1. Setting up
Refer to the guide here.
2. Design
2.1. Architecture
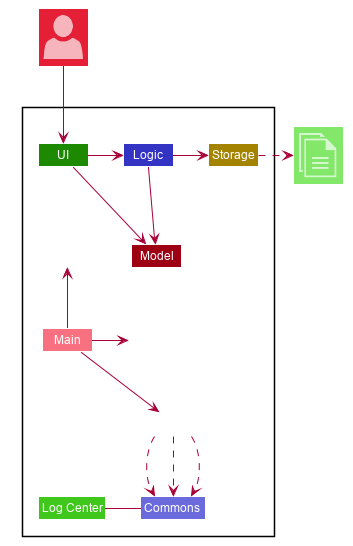
The Architecture Diagram given above explains the high-level design of the App. Given below is a quick overview of each component.
The .puml files used to create diagrams in this document can be found in the diagrams folder.
Refer to the Using PlantUML guide to learn how to create and edit diagrams.
|
-
At app launch: Initializes the components in the correct sequence, and connects them up with each other.
-
At shut down: Shuts down the components and invokes cleanup method where necessary.
Commons represents a collection of classes used by multiple other components.
The following class plays an important role at the architecture level:
-
LogsCenter: Used by many classes to write log messages to the App’s log file.
The rest of the App consists of four components.
Each of the four components
-
Defines its API in an
interfacewith the same name as the Component. -
Exposes its functionality using a
{Component Name}Managerclass.
For example, the Logic component (see the class diagram given below) defines it’s API in the Logic.java interface and exposes its functionality using the LogicManager.java class.
How the architecture components interact with each other
The Sequence Diagram below shows how the components interact with each other for the scenario where the user issues the command delete 1.
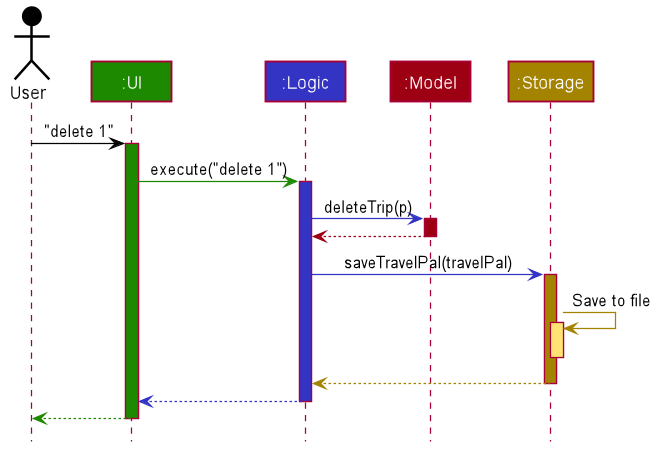
delete 1 commandThe sections below give more details of each component.
2.2. UI component
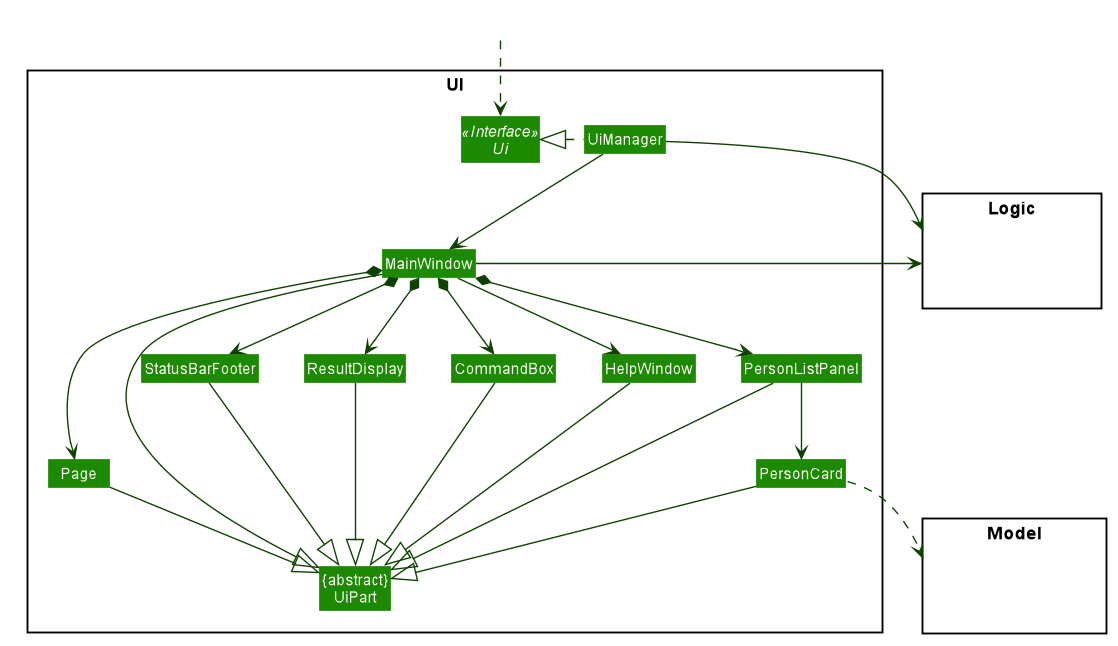
API : Ui.java
The UI consists of a MainWindow that is made up of parts e.g.CommandBox, ResultDisplay,
PersonListPanel, Page etc. All these, including the MainWindow,
inherit from the abstract UiPart class.
The UI component uses JavaFx UI framework. The layout of these UI parts are defined in matching .fxml files that are in the src/main/resources/view folder. For example, the layout of the MainWindow is specified in MainWindow.fxml
Overall, the UI component,
-
Executes user commands using the
Logiccomponent. -
Listens for changes to
Modeldata so that the UI can be updated with the modified data.
2.2.1. Page API
The Page UiPart, as contained by MainWindow, is the key component that reflects the differences
in the data displayed across different pages of the application.
Each class extending Page is able to implement its various components and root JavaFX node types
separately, allowing for much flexibility in terms of the different user interfaces of the pages.
Due to its flexibility, the Page abstract class is mainly only responsible for :
-
Providing its child classes with the supporting instances of
ModelandMainWindowin order to,-
populate the classes' components with data
-
execute commands from the user interface, outside of the
CommandBox(e.g. an add button).
-
-
Providing a way to execute any callback function (such as one to update display data), through use of the abstract method
fillPage. ThefillPagemethod is registered insideMainWindow, such that it runs after each command execution.
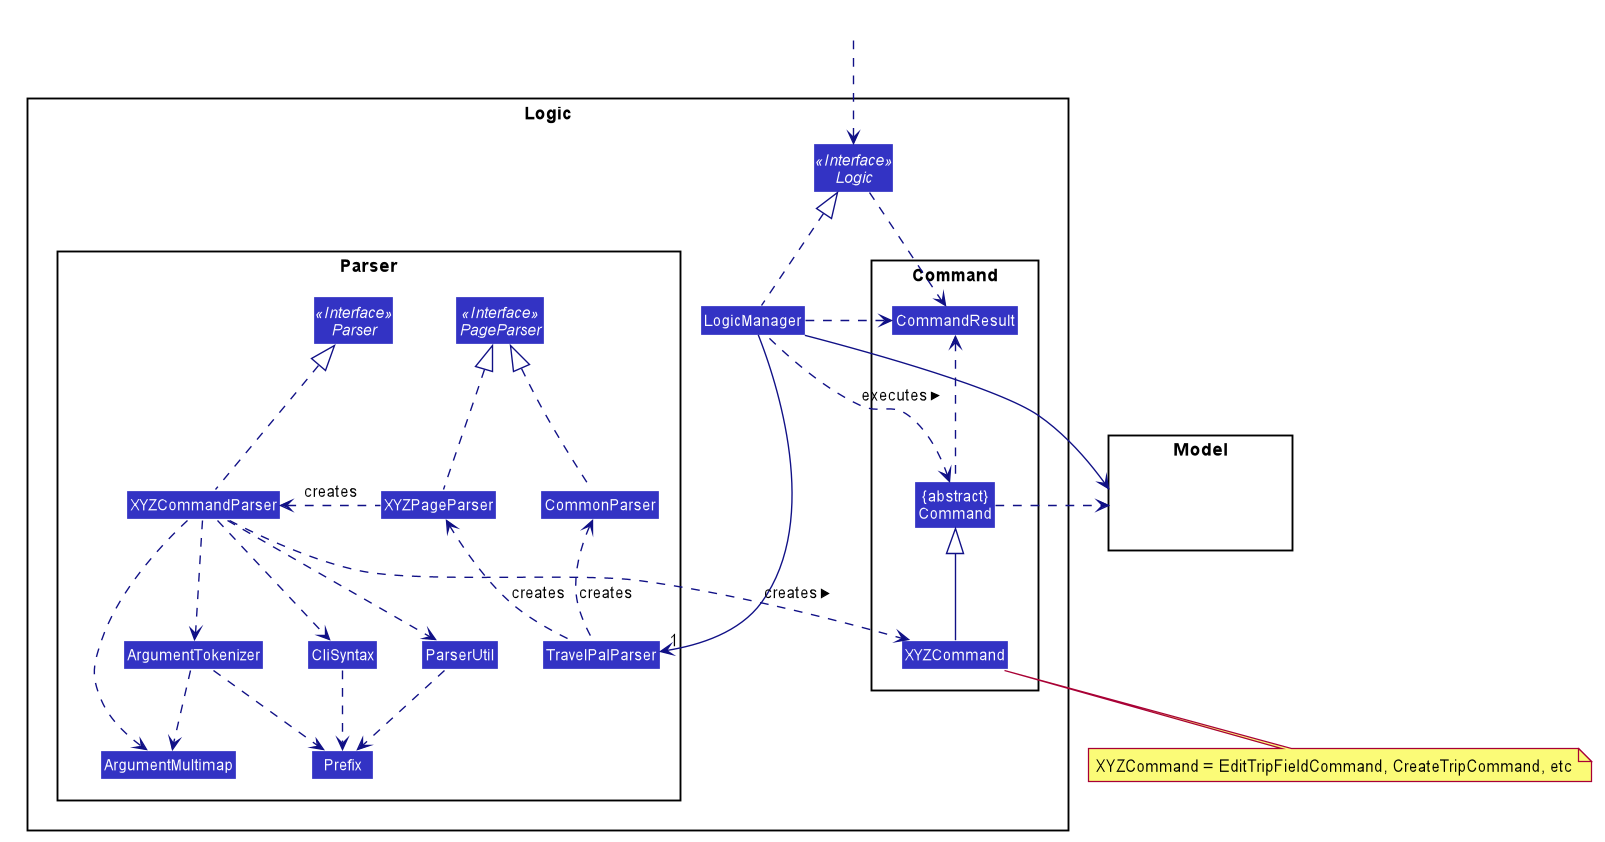
2.3. Logic component
API :
Logic.java
-
Logicuses theAddressBookParserclass to parse the user command. -
This results in a
Commandobject which is executed by theLogicManager. -
The command execution can affect the
Model(e.g. adding a person). -
The result of the command execution is encapsulated as a
CommandResultobject which is passed back to theUi. -
In addition, the
CommandResultobject can also instruct theUito perform certain actions, such as displaying help to the user.
Given below is the Sequence Diagram for interactions within the Logic component for the execute("delete 1") API call.
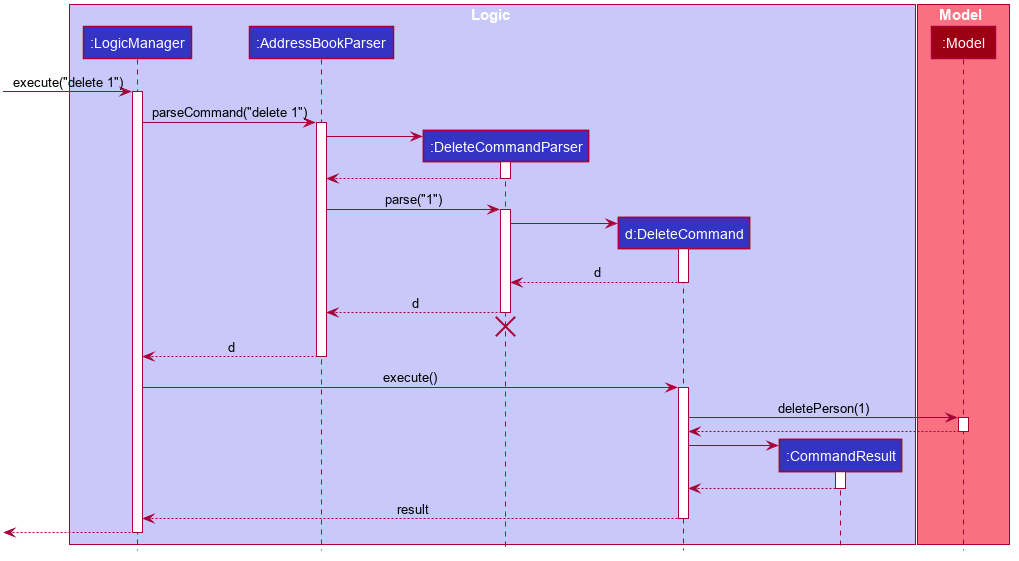
delete 1 Command
The lifeline for DeleteCommandParser should end at the destroy marker (X) but due to a limitation of PlantUML, the lifeline reaches the end of diagram.
|
2.4. Model component
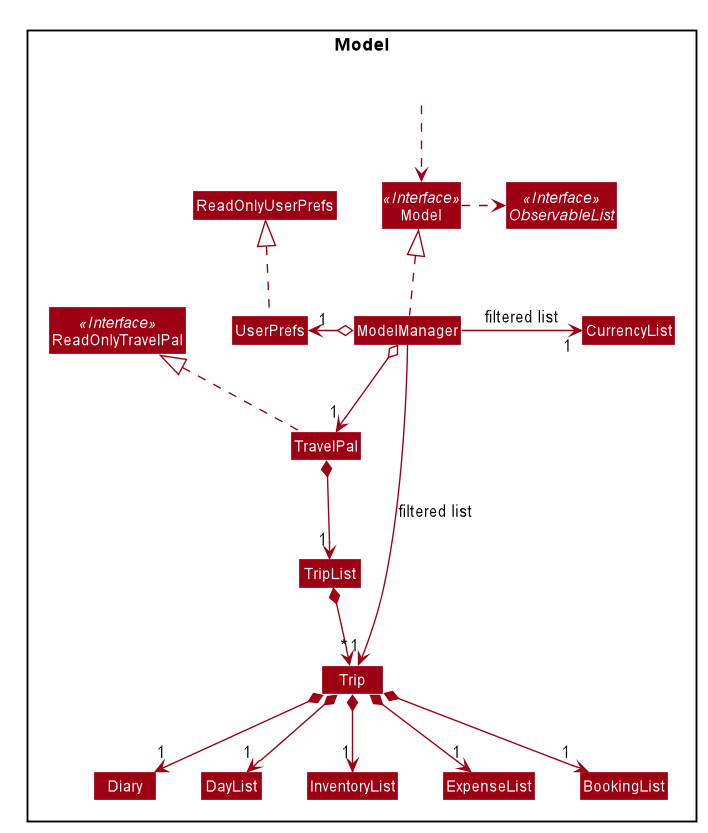
API : Model.java
The Model,
-
stores TravelPal’s trip data.
-
stores a
UserPrefobject that represents the user’s preferences. -
stores a
CurrencyListobject that represents the user’s added currencies. -
exposes several unmodifiable
ObservableListsthat can be 'observed' e.g. the UI can be bound to this list so that the UI automatically updates when the data in the list change. -
does not depend on any of the other three components.
2.5. Storage component
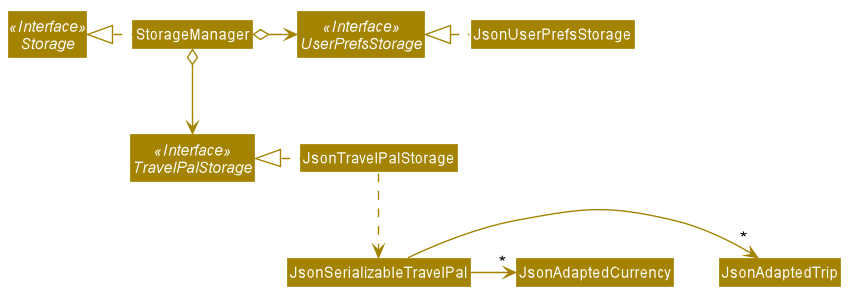
API : Storage.java
The Storage component,
-
can save
UserPrefobjects in json format and read it back. -
can save the Travel Pal data in json format and read it back.
2.6. Common classes
Classes used by multiple components are in the seedu.addressbook.commons package.
3. Implementation
This section describes some noteworthy details on how certain features are implemented.
3.1. [Itinerary] Edit trip/day/event feature
3.1.1. Aspect: Logic
Editing of trip/day/event can be accessed from TripsPage/DaysPage/EventsPage respectively.
The execution of commands in the each page is facilitated by TripManagerParser/DayViewParser/EventViewParser which extends from the PageParser. This class serves as the abstraction for all parsers related to each Page.
The operations are exposed to the Model interface through the Model#getPageStatus()
method that returns the PageStatus containing the all information regarding the current state of application. This includes the descriptors (explained in Step 1 below) which stores all information about the edit.
Given below is an example usage scenario and how the program behaves at each step.
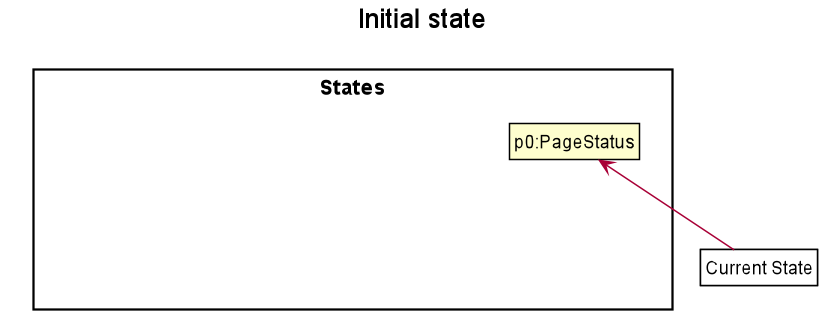
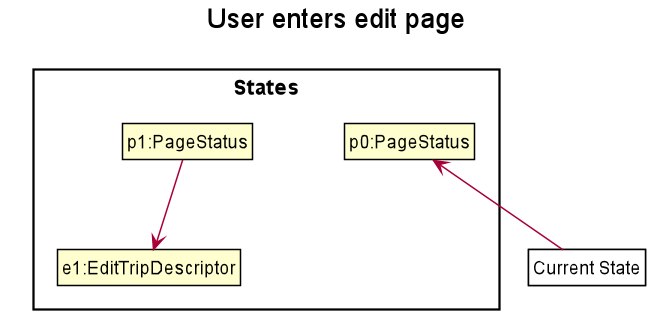
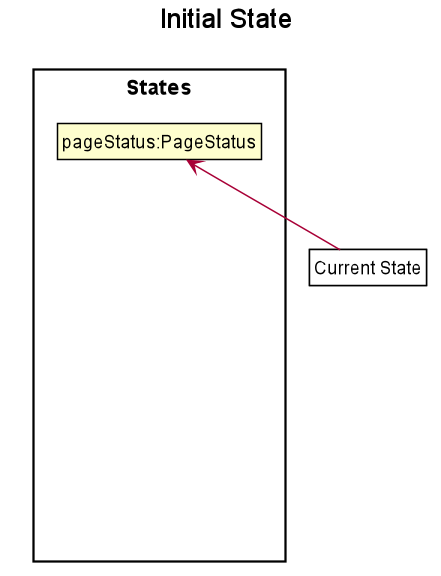
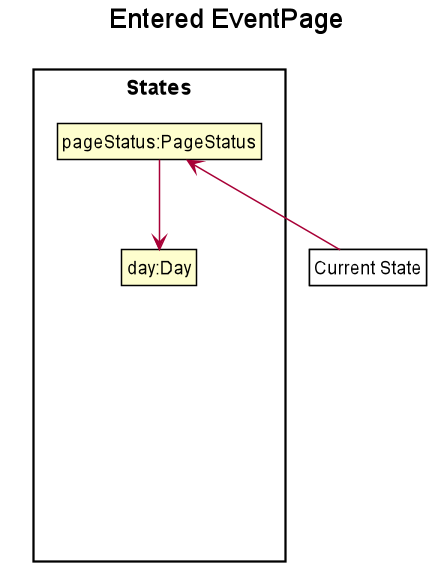
Step 1. When the user launches the application. The PageStatus is initialized under along with other Model components. PageStatus at launch does not contain any EditTripDescriptor/EditDayDescriptor/EditEventDescriptor responsible for storing information for the edit.
Step 2. The user currently on the TripsPage/DaysPage/EventsPage is displayed a list of Trip/Day/Event respectively. The user executes the edit command EDIT1 using the OneBasedIndex on the list to edit it.This executes the EnterEditTripFieldCommand/EnterEditDayFieldCommand/EnterEditEventFieldCommand that initializes a new descriptor within PageStatus before switching over to the EditTripPage/EditDayPage/EditEventPage containing to perform the editing.
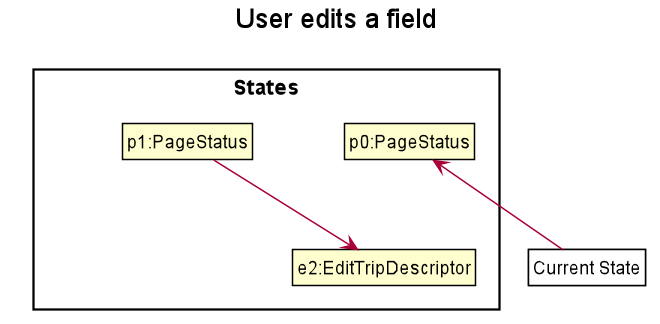
Step 3. The user is now on the edit page displaying a list of fields that the user can edit in the Trip/Day/Event. Commands on each page differs based on the fields they contain.
The following is an example list of commands available in DaysPage and the execution of the program when a field is edited in DaysPage:
-
edit n/<name> ds/<startDate> de/<endDate> b/<totalBudget> l/<destination> d/<description>- Edits the relevant fields -
done- Completes the edit and returns to the Overall View -
cancel- Discards the edit and returns to the Overall View
When user executes the command edit n/EditedName on the DaysPage. The command creates a new descriptor from the contents of the original, replacing the fields only if they are edited. The new descriptor is then assigned to PageStatus replacing the original EditDayDescriptor. The result of the edit is then displayed to the user.
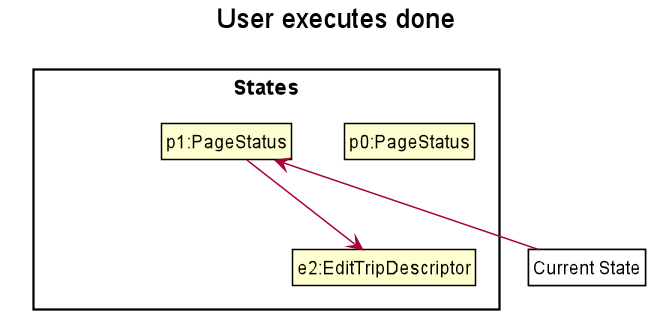
Step 4. The user has completed editing the Trip/Day/Event and executes done/cancel to confirm/discard the edit. The execution of the two cases are as follows:
-
The user executes
doneto confirm the edit. This executes theDoneEditTripCommand/DoneEditDayCommand/DoneEditEventCommandand aTrip/Day/Eventis built from the descriptor respective to the type it describes.DayList#set(target, edited)proceeds to be executed which accesses theDayto edit from thedayfield inPageStatusas the target. This method replaces the original day with the newly built day from the descriptor. The descriptor inPageStatusis then reset to contain empty fields (See figure below).
-
The User executes
cancelto discard the edit. This executes theCancelEditTripCommand/CancelEditDayCommand/CancelEditEventCommandwhich resets the descriptor inPageStatusto contain all empty fields.
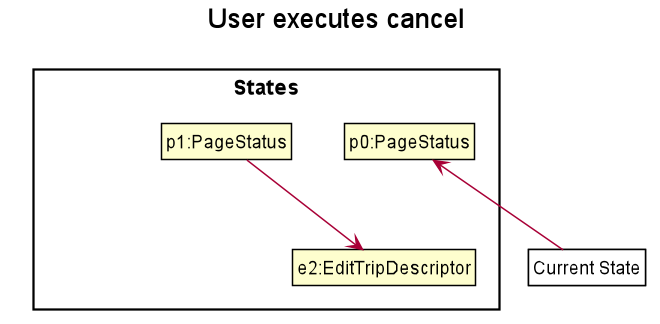
-
Upon completion of the edit, the user is returned to the
TripPage/DaysPage/EventsPagedepending on where the user entered the edit page from.
Below is a sequence diagram illustrating the execution of the command "edit ds/10/10/2019" on Days Page:
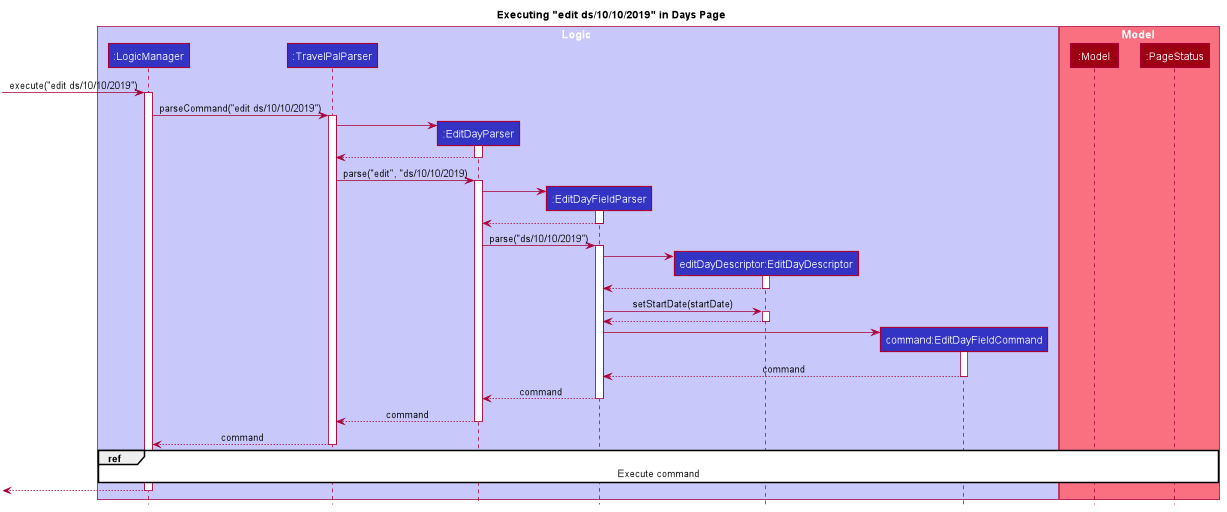
edit ds/10/10/2019-
When the command is executed, TravelPal uses a series of parsers to parse entire command
-
TravelPalParser: Parses the command. In execution above, it is identified that the first word is the command. -
EditDayParser: Parses the type of command. The string "edit" is parsed and correctly identifiesEditDayParsershould be used to continue parsing further tokens -
EditDayFieldParser: Parses the details of the edit. In this execution, the date is parsed by theDateParserUtilclass and creates a descriptor as mentioned in the section above
-
After executing the parsers above, the last parser instantiates and recursively returns the command (e.g. commandEditDayFieldCommand) up to the LogicManager. LogicManager then executes the command as the sequence diagram below:

The execution of the command is explained above (refer to Section 3.1.1, “Aspect: Logic”).
3.1.2. Aspect: User Interface
The UI for to edit fields are associated with the EditTripPage/EditDayPage/EditEventPage respectively.
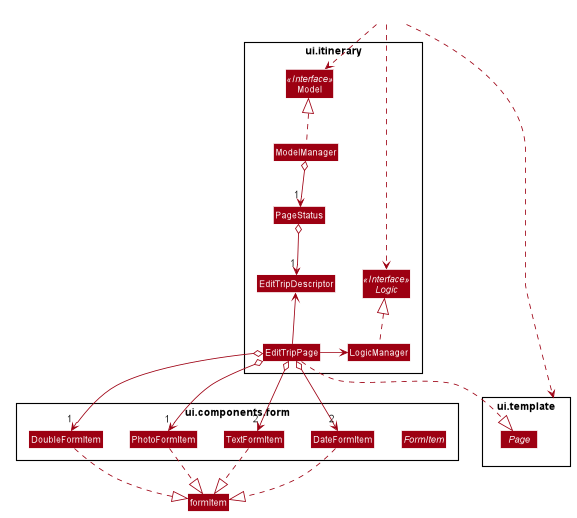
The execution of the edit command involves the Model, Logic and Ui components of the application. Listed here are the packages used in the execution of the edit commands that are found in the figure above:
-
ui.itinerary: This package contains all the Ui classes for the Itinerary feature.
-
ui.components.form: Contains all the form items
-
ui.template: This package contains the
Pageclass which all pages extend from
The class at large in the diagram above is the EditTripPage of the 3 pages explained. It extends from the Page class and is associated with the following:
-
Contains
formItemsfrom theui.components.formgenerate a form-
The
FormItems(e.g.DateFormItem) are instantiated by theEditTripPage#initFormWithModelmethod called by the constructor ofEditTripPage. EachFormItemcontains anexecuteChangeHandlerthat executes whenever theonChangeproperty is modified by the user. These are initialized as execution of the various edit commands (e.g. EditTripFieldCommand/EditDayFieldCommand/EditEventFieldCommand) using the value in theFormItem.
-
-
Navigable to the
ModelManagerandLogicManagerfor execution of commands using Ui interactions.
The contents of the fields are updated by the execution of the commands above. When the user edits any of the FormItems, the commands are executed which will cause the EditTripPage/EditDayPage/EditEventPage#fillPage() to execute again. fillPage retrieves the updated fields from PageStatus and displays them as the values in the FormItems.
3.1.3. Aspect: Workflow of execution
The logic of editing a field and committing it to memory is a simple process of validating each field. If any field fails to meet the specifications, the Trip/Day/Event will not be created/edited. Below is an example execution of validating the edit:
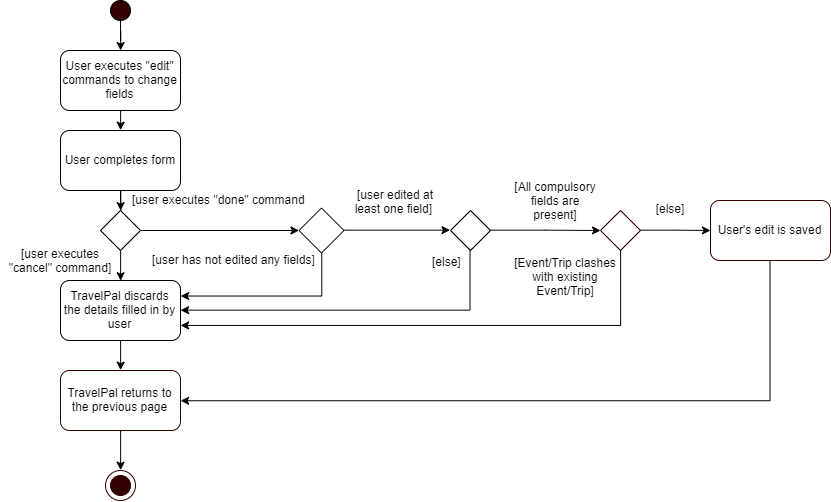
3.1.4. Aspect: Design considerations
When designing this feature, there were several challenges involved while working with the existing code base especially to adhere to strict Object Orientated Programming Principles. Below are two such design challenges that and how they were resolved:
| Challenge | Alternative 1 | Alternative 2 | Chosen Option |
|---|---|---|---|
Handling Dynamic UI Changes |
The first alternative was to consider the updating of ui as a state of the program. The |
The second alternative was to let pages that can change by execution of commands (dynamic pages) to extend the class |
Alternative 2 was chosen due better Object Orientated Programming (OOP) principles. The second method was good practice of the Interface Segregation Principle where classes do not need to depend on methods it did not need. Static pages in the program does not inherit However limitations of Java arose as classes cannot inherit more than one class at once. Instead of using the class |
Storing of the user’s edit information |
The first alternative was the straight forward implementation of using the |
The second alternative was using |
The second alternative was chose mainly due to the coherence to the design of using forms. The descriptors also serve as minor validations (e.g. Only alphanumeric characters, up to 40 characters etc.). Users can be informed earlier of mistakes in filling forms before submitting. |
3.2. [Itinerary] Delete Trip/Day/Event
3.2.1. Implementation
Deletion of Trip/Day/Event is facilitated by PageStatus. PageStatus stores the current state of execution of the user program.
Upon initial startup of the program Model is initialized with PageStatus with the PageType set to enum PageType#TRIP_MANAGER. This indicates the current page displayed to the user. PageStatus is initialized with empty references to the Trip/Day/Event the user executes an action for.
Step 1. When the user launches the application. PageStatus is initialized along with other Model components with empty references.
Step 2. The user enters the DaysPage/EventsPage using the goto command. This instantiates a new PageStatus object from the the existing PageStatus with a modified Day/Trip, providing the context for subsequent actions. Below is an example execution of the command:
Step 3. The user is now on the TripManager/DaysPage/EventsPage, the user can execute the delete command in accordance to the display ordered index on any of the aforementioned pages.
When the command delete <index> is executed, DeleteTripCommand/DeleteDayCommand/DeleteEventCommand is executed. This command accesses Trip/Day reference in PageStatus assigned by the previous step. (Note: deleting Trips do not require PageStatus, it being directly accessible to Model using TripList accessors).
The Day/Trip reference contains the list of Events/Days in memory respectively (DayList/EventList). DayList#remove/EventList#remove are methods in the respective list classes used to delete the day/event. These are executed, modifying the in memory TravelPal and Trip/Event/Day is removed.
3.3. [Expense] Expense Manager
The Expense Manager is one of the main features of TravelPal, it maintains a list of Expense stored in an ExpenseList.
Expense Manager is also capable of calculating and displaying budget, sorting expenses and toggling display options.
3.3.1. Aspect : Model
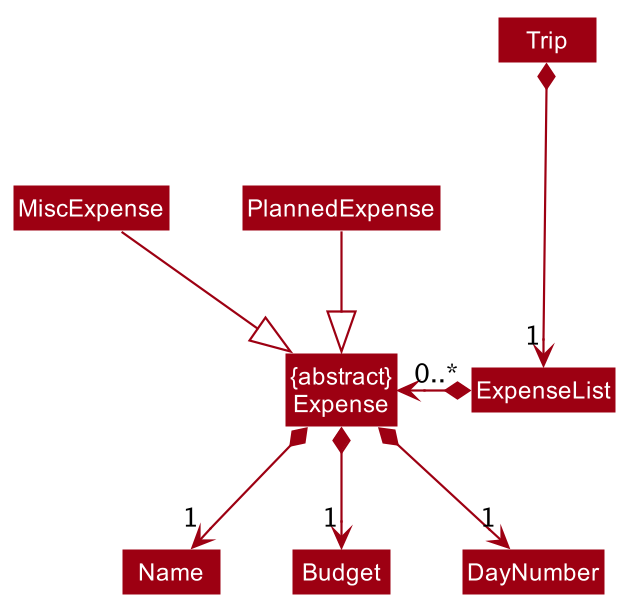
Expense
Expense is an abstract class storing expense model.
It has three compulsory fields, the name of expense, the amount of expense, and a day number. These fields are used to store information related to an expense.
They are implemented as instance of class Name Budget and DayNumber respectively.
MiscExpense and PlannedExpense are the child classes extending from Expense class, they are
used to represent the two types of expenses: miscellaneous expense and planned expense.
ExpenseList
ExpenseList is an class that stores the Expense models.
It supports wrapper methods around the underlying ObservableList to facilitate the use in the logic components.
3.3.2. Aspect : UI

The ExpensesPage implements an UiChangeConsumer interface to facilitate the toggling between the Days View and
List View of Expense Manager, which is not shown in the diagram above.
|
The UI of expense manager mainly consists of two Page: ExpensesPage and EditExpensePage.
ExpensePage is the component in charge of displaying expense and budget information. It has a list of ExpenseCard, a component
that contains individual expense details. ExpensePage extends PageWithSidebar as it contains navigation bar that helps user to
navigate between different features.
In ExpensePage, user can toggle between Days View and List View. In Days View, a list of DailyExpensesPanel is used to group
ExpenseCard according to date.
EditExpensePage is the main page for creating and editing of expense. Both ExpensesPage and EditExpensePage have access to Model and Logic
of the application, for handling of stored data and parsing commands.
From ExpensePage, user can navigate to Currency feature of application through CLI or GUI.
3.3.3. Aspect : Logic
Create an expense
The creation of a new Expense is done in two ways:
-
The creation of a
PlannedExpenseis created when a newEventwith aBudgetis created. The execution happens inDoneEditingEventCommand.-
When the
NameorBudgetfield ofEventis modified, a method call replaces the currentExpenseassociated with theEventwith an updatedExpense.
-
-
The creation of a
MiscExpenseis done by callingEnterCreateExpenseCommand, which brings user to an Expense Setup Page.
Edit an expense
Editing of expense can be accessed from ExpensePage. The execution of command is handled by ExpenseManagerParser and
the command accesses the model through Model#getPageStatus() method. The details of execution is similar to Edit trip/day/event feature (see Section 3.1, “[Itinerary] Edit trip/day/event feature”)
Only the amount of expense field of a PlannedExpense can be edited with an edit command. When done command is executed
after the amount of expense is edited, both the expense in ExpenseList and the Event will be updated.
The following sequence diagram shows the sequence of method call when DoneEditCommand#execute(model) is called in LogicManager.
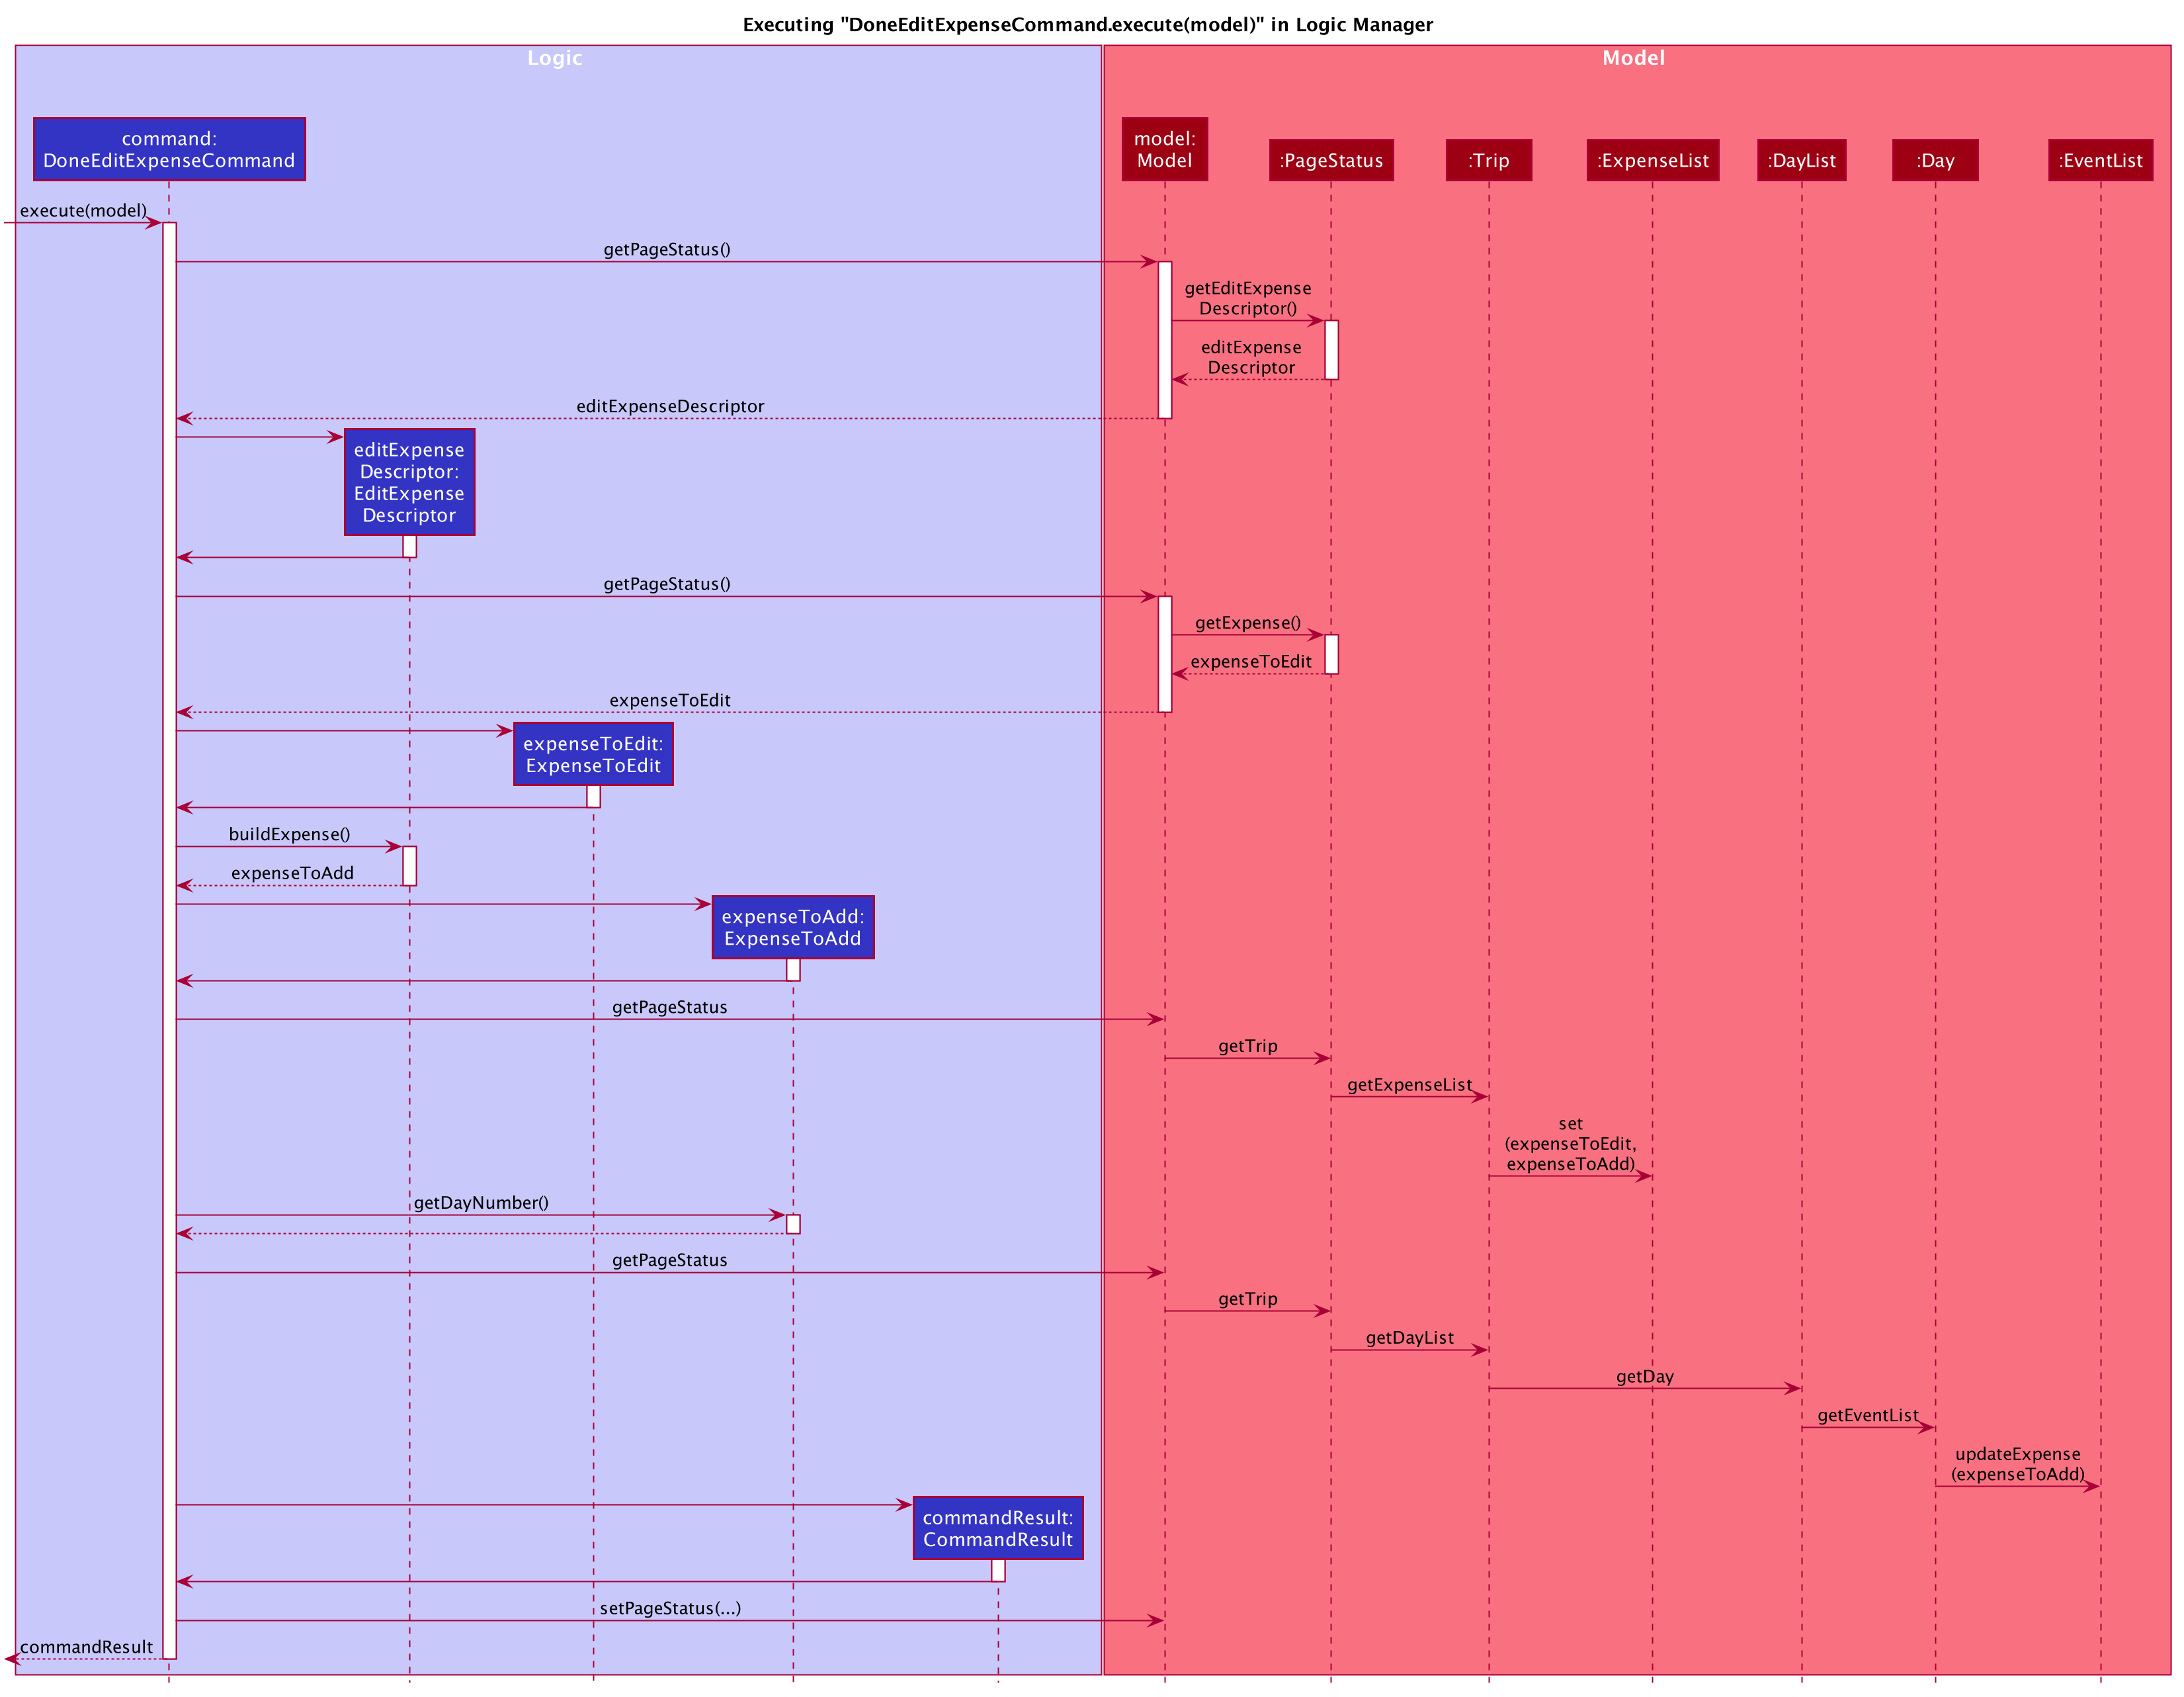
When DoneEditCommand#execute(model) is called, getPageStatus() is used to fetch information / update information from model. The following
steps shows the sequence of event happened within the method:
-
The current instance of
EditExpenseDescriptorandExpenseinmodelare returned and stored aseditExpenseDescriptorandexpenseToEditinlogic. -
A new instance of
Expense,expenseToAddis created by callingbuildExpense()ineditExpenseDescriptor. -
Through
getPageStatus(),set(expenseToEdit, expenseToAdd)is called onEventList, which updates the uneditedexpenseToEditby replacing it with the editedexpenseToAdd. -
The
DayNumberinexpenseToAddis returned so that logic can update the associatedEventby going to the correspondingDayinDayList. -
updateExpense(expenseToAdd)is called onEventListso that the targetEventwill have itsExpenditureupdated. -
By calling
setPageStatus(), the currentEditExpenseDescriptorandExpensewill be reset, the current page will be set to Expense Manager Page. -
CommandResultis returned to give user feedback and update UI.
Delete an Expense
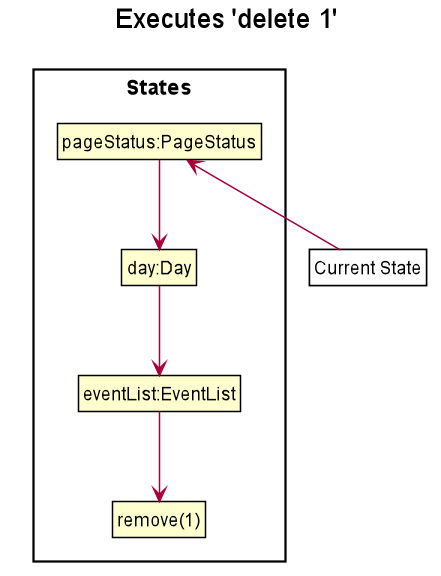
Deletion of expense is similar to the Delete Trip/Day/Event feature (see Section 3.2, “[Itinerary] Delete Trip/Day/Event”).
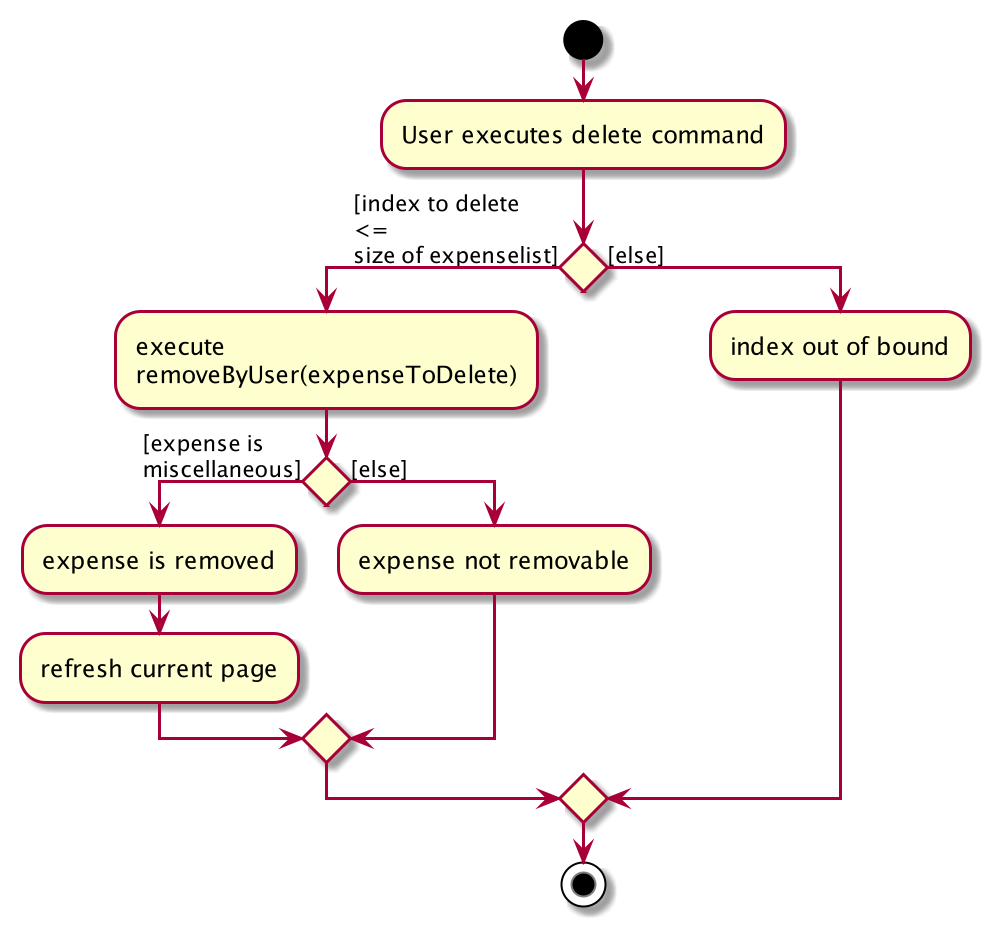
The DeleteExpenseCommand in logic checks for index of deletion and type of expense. Only MiscExpense can be deleted through
this command. Below is an example execution of deleting an expense:
3.4. [Currency] Currency
The Currency maintains a list of CustomisedCurrency stored in an CurrencyList.
Currency supports creation, deletion and selection of currency.
3.4.1. Aspect : Model
CustomisedCurrency
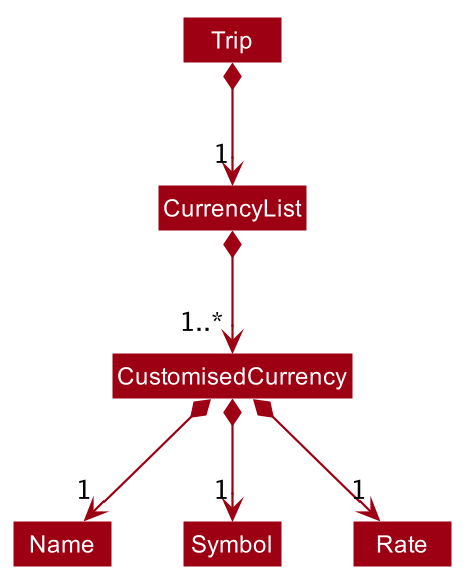
CustomisedCurrency is the generic abstraction of a user defined currency.
A CustomisedCurrency contains exactly one instance Name Symbol and Rate for each of these three classes, which represents
the name of currency, currency symbol, and exchange rate of the currency (to Singapore Dollars) respectively.
CurrencyList
CurrencyList is an class that stores the CustomisedCurrency instances. It supports wrapper methods around the underlying ObservableList for the use of logic components.
3.4.2. Aspect : UI

The main Page for displaying and creating currency is CurrencyPage. The page contains a list of CurrencyCard for displaying
individual currency details. Two types of CurrencyCard: SelectedCurrencyCard and UnelectedCurrencyCard are used to indicate
the currency in use. Upon launching of the application, a default CustomisedCurrency — Singapore Dollars is automatically added to
the CurrencyList, which is not deletable. Thus, there will always be at least one CurrencyCard in CurrencyPage.
CurrencyPage also contains text fields for input of new currency information. It has a PresetSymbols instance which contains a group of ToggleButton which
updates the symbol in MainWindow. CurrencyPage have access to Model and Logic
of the application, for handling of stored data and parsing commands.
From ExpensePage, user can navigate to Expense Manager feature of application through CLI or GUI.
3.4.3. Aspect : Logic
The executions of add / delete of CustomisedCurrency is similar to those of Trip / Day / Event / Expense. More details can be found in the previous sections:
Section 3.1, “[Itinerary] Edit trip/day/event feature”
Select a Currency
Selection of CustomisedCurrency is achieved by promoting it to the front of CurrencyList, while the first CustomisedCurrency in the list
is to be used to display Budget with the selected currency symbol and rate conversion.
All the monetary values in the application is displayed through calling the method from UI: Budget#getValueStringInCurrency(CustomisedCurrency)
3.5. [Booking] Booking Manager
The Booking Manager is one of the main features of TravelPal. It maintains a list of Booking stored in a
BookingList.
Booking Manager displays all the Bookings in one place with Name, Contact details and expenditure in the form of Budget.
3.5.1. Aspect : Model
Booking
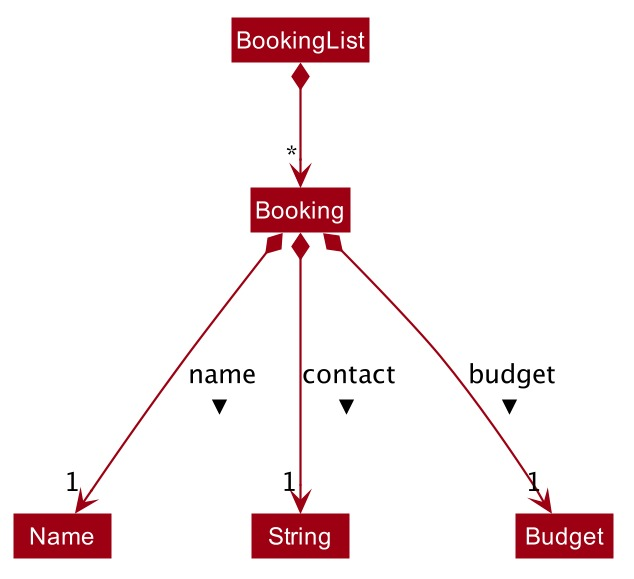
Booking is a class storing Booking model.
It has three compulsory fields, the name of booking, the contact details of booking and the expenditure of booking (in budget). These fields are used to store information related to a booking.
They are implemented as instance of class Name, Contact and Budget respectively.
BookingList
BookingList is a class that stores the Booking models.
It supports wrapper methods around the underlying ObservableList to facilitate the use in the logic components.
3.5.2. Aspect : UI
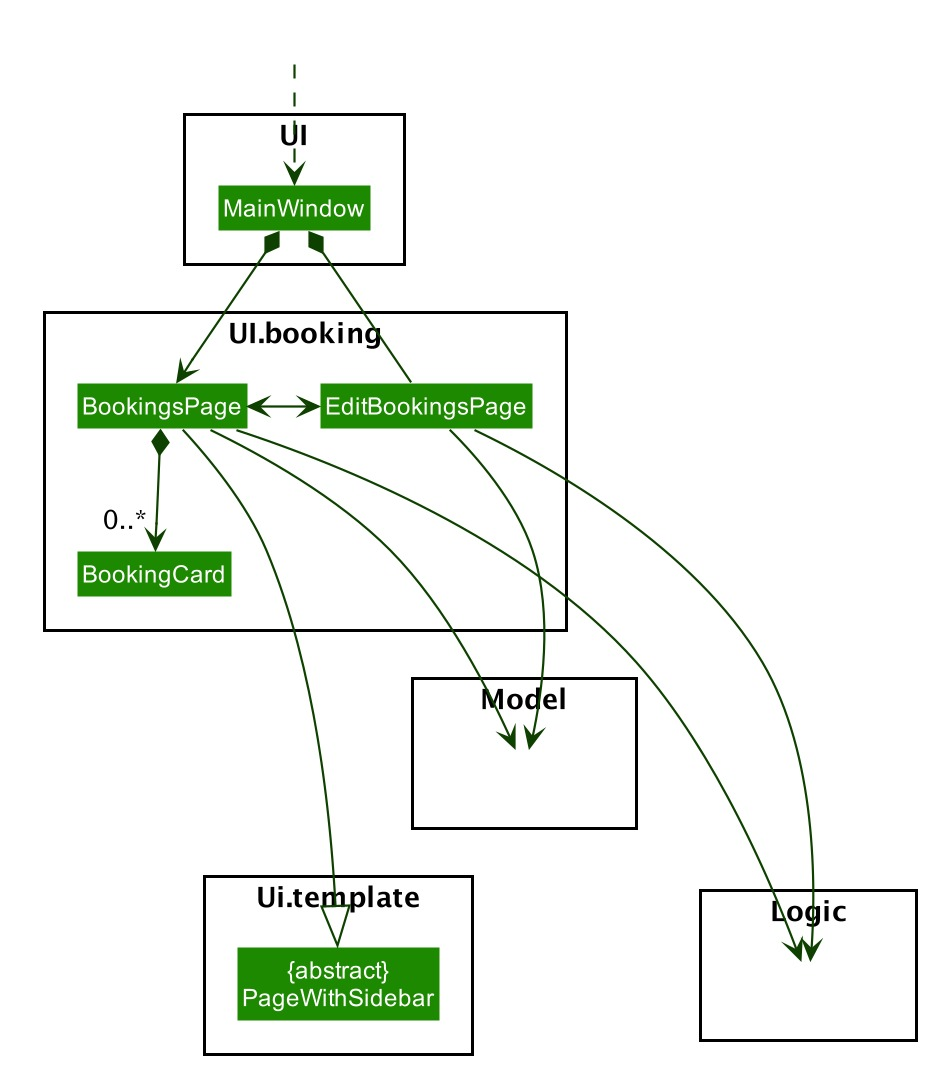
The UI of Booking Manager mainly consists of two Page: BookingsPage and EditBookingsPage.
BookingsPage is the component in charge of displaying all the information of the booking: name, contact details and
associated expenditure.
It has a list of BookingCard, a component that contains individual booking details. BookingsPage extends
PageWithSidebar as it contains navigation bar that helps user to
navigate between different main features.
EditBookingsPage is the main page for creating and editing of booking. Both BookingsPage and EditBookingsPage
have access to Model and Logic of the application, for handling of stored data and parsing commands.
3.5.3. Aspect : Logic
Create a booking
The creation of a new Booking is done by calling EnterCreateBookingCommand, which brings user to a
Booking Setup Page.
Edit a booking
Editing of booking can be accessed from BookingsPage. The execution of command is handled by BookingsManagerParser and
the command accesses the model through Model#getPageStatus() method.
The details of execution is similar to Edit trip/day/event feature (see Section 3.1, “[Itinerary] Edit trip/day/event feature”)
All the fields, namely name, contact and budget, of a Booking can be edited with an edit command. When done
command is executed the Booking in BookingList will be updated.
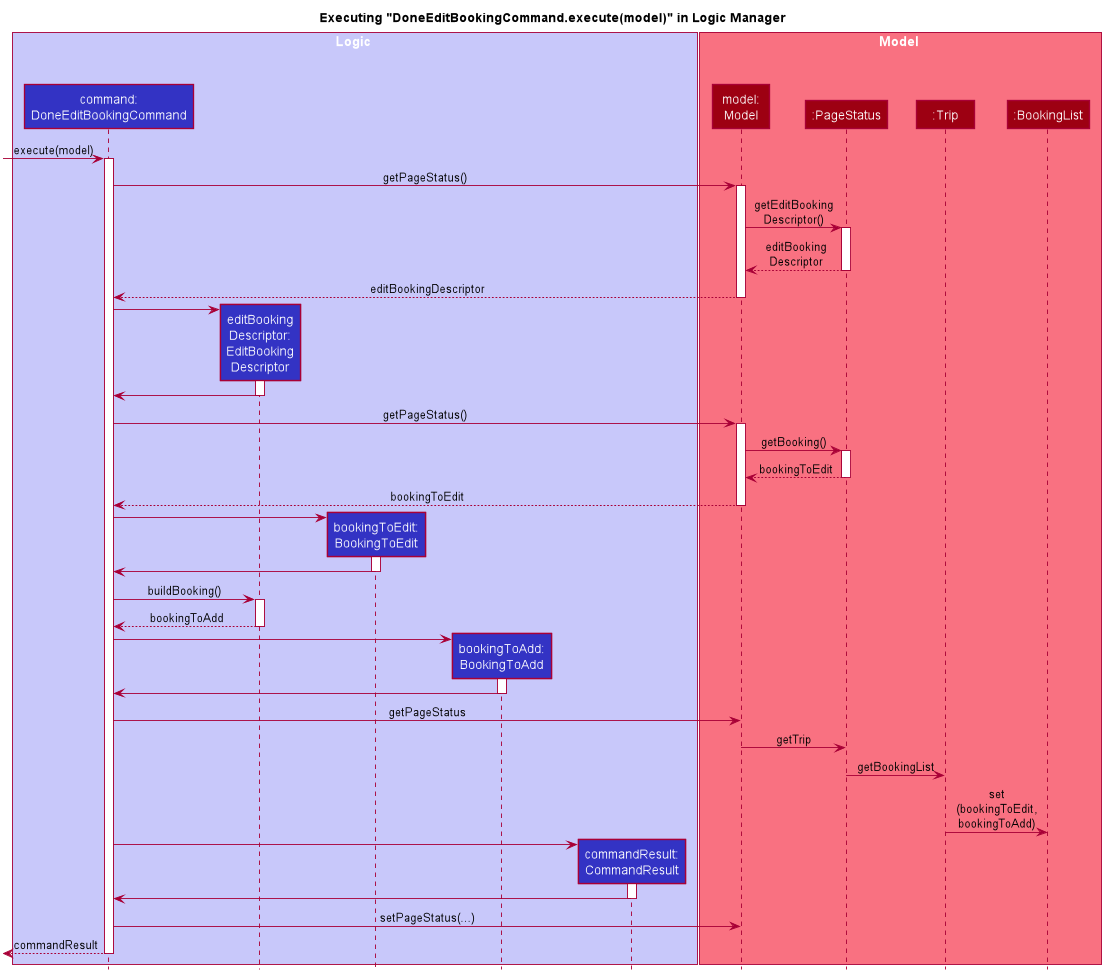
The following sequence diagram shows the sequence of method call when DoneEditCommand#execute(model) is called in
LogicManager.
UI Diagram shows the calling of various other classes (via FXML pages) which are linked to creation of Booking.
Edit a Booking
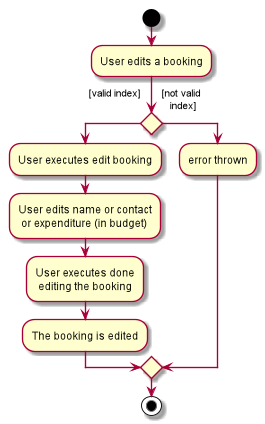
edit functionality of Booking| When error is thrown, the user is expected to use a valid index. |
Delete a Booking
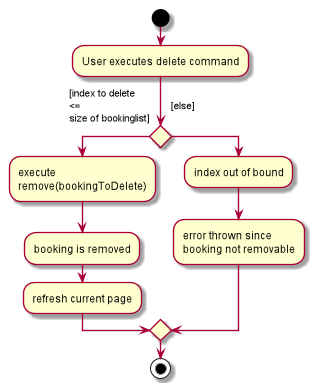
delete functionality of BookingDeletion of booking is similar to the Delete Trip/Day/Event feature (see Section 3.2, “[Itinerary] Delete Trip/Day/Event”).
The DeleteBookingCommand in logic checks for index of deletion.
Below is the sequence diagram of deleting an expense:
3.6. [Proposed] Undo/Redo feature
3.6.1. Proposed Implementation
The undo/redo mechanism is facilitated by VersionedAddressBook.
It extends AddressBook with an undo/redo history, stored internally as an addressBookStateList and currentStatePointer.
Additionally, it implements the following operations:
-
VersionedAddressBook#commit()— Saves the current address book state in its history. -
VersionedAddressBook#undo()— Restores the previous address book state from its history. -
VersionedAddressBook#redo()— Restores a previously undone address book state from its history.
These operations are exposed in the Model interface as Model#commitAddressBook(), Model#undoAddressBook() and Model#redoAddressBook() respectively.
Given below is an example usage scenario and how the undo/redo mechanism behaves at each step.
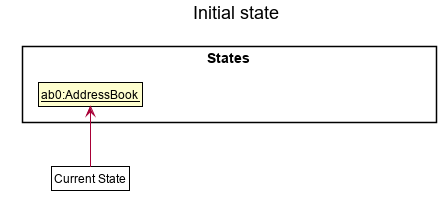
Step 1. The user launches the application for the first time. The VersionedAddressBook will be initialized with the initial address book state, and the currentStatePointer pointing to that single address book state.
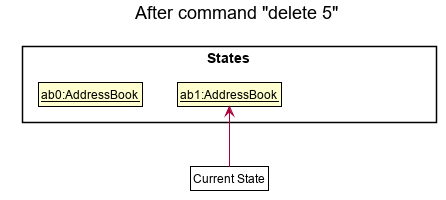
Step 2. The user executes delete 5 command to delete the 5th person in the address book. The delete command calls Model#commitAddressBook(), causing the modified state of the address book after the delete 5 command executes to be saved in the addressBookStateList, and the currentStatePointer is shifted to the newly inserted address book state.
Step 3. The user executes add n/David … to add a new person. The add command also calls Model#commitAddressBook(), causing another modified address book state to be saved into the addressBookStateList.
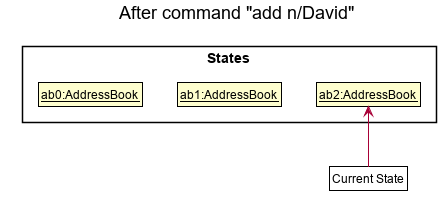
If a command fails its execution, it will not call Model#commitAddressBook(), so the address book state will not be saved into the addressBookStateList.
|
Step 4. The user now decides that adding the person was a mistake, and decides to undo that action by executing the undo command. The undo command will call Model#undoAddressBook(), which will shift the currentStatePointer once to the left, pointing it to the previous address book state, and restores the address book to that state.
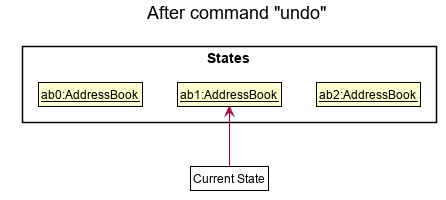
If the currentStatePointer is at index 0, pointing to the initial address book state, then there are no previous address book states to restore. The undo command uses Model#canUndoAddressBook() to check if this is the case. If so, it will return an error to the user rather than attempting to perform the undo.
|
The following sequence diagram shows how the undo operation works:
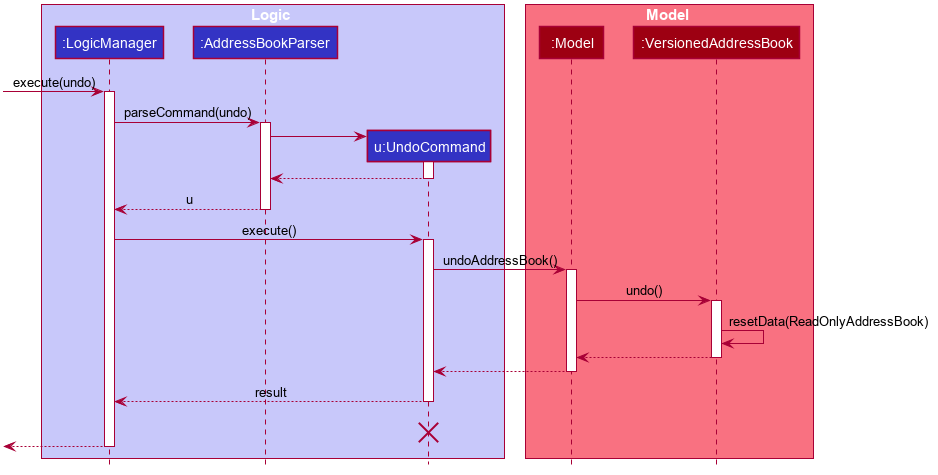
The lifeline for UndoCommand should end at the destroy marker (X) but due to a limitation of PlantUML, the lifeline reaches the end of diagram.
|
The redo command does the opposite — it calls Model#redoAddressBook(), which shifts the currentStatePointer once to the right, pointing to the previously undone state, and restores the address book to that state.
If the currentStatePointer is at index addressBookStateList.size() - 1, pointing to the latest address book state, then there are no undone address book states to restore. The redo command uses Model#canRedoAddressBook() to check if this is the case. If so, it will return an error to the user rather than attempting to perform the redo.
|
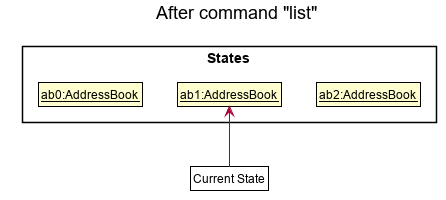
Step 5. The user then decides to execute the command list. Commands that do not modify the address book, such as list, will usually not call Model#commitAddressBook(), Model#undoAddressBook() or Model#redoAddressBook(). Thus, the addressBookStateList remains unchanged.
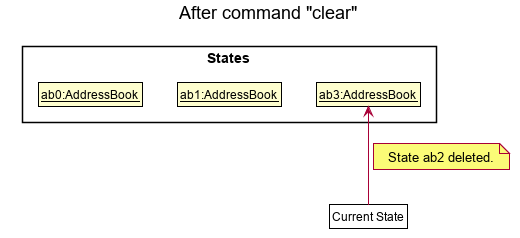
Step 6. The user executes clear, which calls Model#commitAddressBook(). Since the currentStatePointer is not pointing at the end of the addressBookStateList, all address book states after the currentStatePointer will be purged. We designed it this way because it no longer makes sense to redo the add n/David … command. This is the behavior that most modern desktop applications follow.
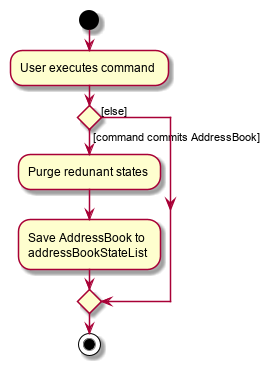
The following activity diagram summarizes what happens when a user executes a new command:
3.6.2. Design Considerations
Aspect: How undo & redo executes
-
Alternative 1 (current choice): Saves the entire address book.
-
Pros: Easy to implement.
-
Cons: May have performance issues in terms of memory usage.
-
-
Alternative 2: Individual command knows how to undo/redo by itself.
-
Pros: Will use less memory (e.g. for
delete, just save the person being deleted). -
Cons: We must ensure that the implementation of each individual command are correct.
-
Aspect: Data structure to support the undo/redo commands
-
Alternative 1 (current choice): Use a list to store the history of address book states.
-
Pros: Easy for new Computer Science student undergraduates to understand, who are likely to be the new incoming developers of our project.
-
Cons: Logic is duplicated twice. For example, when a new command is executed, we must remember to update both
HistoryManagerandVersionedAddressBook.
-
-
Alternative 2: Use
HistoryManagerfor undo/redo-
Pros: We do not need to maintain a separate list, and just reuse what is already in the codebase.
-
Cons: Requires dealing with commands that have already been undone: We must remember to skip these commands. Violates Single Responsibility Principle and Separation of Concerns as
HistoryManagernow needs to do two different things.
-
3.7. [Proposed] Data Encryption
{Explain here how the data encryption feature will be implemented}
3.8. [Diary] Photo Manager
The photo manager pertains to components for storing, and displaying user specified photos on the disk.
3.8.1. Aspect: Models
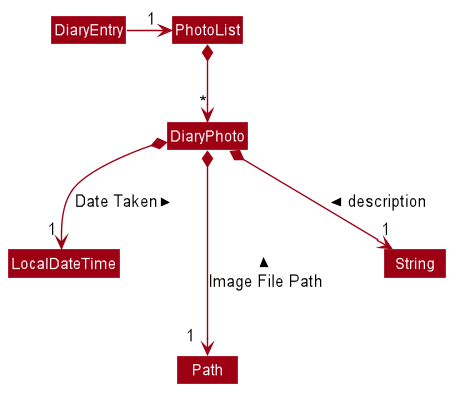
PhotoList as contained by a diary entry, and its contained modelsPhoto
The model for a photo stored in memory is stored in the DiaryPhoto class.
It contains three key fields, that is, the imagePath, description, and dateTaken fields which are used to display key information of the image to the user.
The imagePath and dateTaken were implemented respectively with the robust java apis of Path and LocalDateTime, while description is simply a String.
In addition, a JavaFX Image is also stored inside the DiaryPhoto (not shown in Figure 24, “Class diagram of a PhotoList as contained by a diary entry, and its contained models” for brevity),
which holds the Image to use for displaying in an ImageView inside the user interface. The Image is cached this way,
as on-demand Image construction in the user interface involves costly I/O operations.
|
Restrictions on fields during
|
PhotoList
On the other hand, the DiaryPhoto models are contained within a PhotoList. It stores the photos in a JavaFX ObservableList,
so that changes are registered with the user interface. (see Section 3.8.2, “Aspect: User interface of photo manager”)
It also supports several convenience wrapper methods around the underlying ObservableList, tailored for use for the logic components.
3.8.2. Aspect: User interface of photo manager
The main UiPart component that displays photos is the DiaryGallery.
It abides by the Page implementation (see Section 2.2.1, “Page API”), and is thus contained within,
in one of DiaryPage’s placeholders.
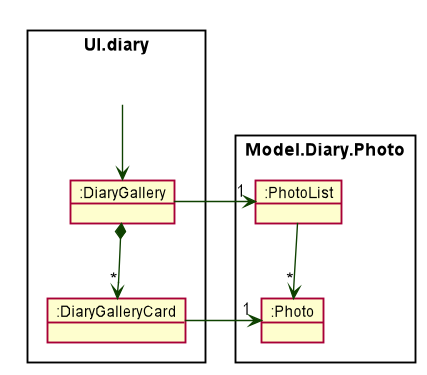
DiaryPage (not shown)The main JavaFX component responsible for displaying the photos is a ListView<DiaryPhoto> component.
The ListView obtains its data from the PhotoList of
the DiaryGallery, which is automatically observed by the ListView.
Hence, changes in the PhotoList, such as the addition of a DiaryPhoto are immediately communicated
to the user interface.
The ListView uses a simple custom cell factory, which sets the ListCells of the ListView to use DiaryGalleryCards
as its graphic. DiaryGalleryCards are in turn generated in the cell factory using the ListCell’s index and a DiaryPhoto instance.
DiaryGalleryCards display the information as supplied by the DiaryPhoto model using a series of Labels and one ImageView.
Additionally, the index of the card as ordered in the DiaryGallery is also displayed, but not stored in the model.
3.8.3. Aspect: Logic of photo manager operations
The logic for photo manager plays to the same PageParser structure of parsing commands, that is,
DiaryParser returns either AddPhotoParser, DeletePhotoParser when the appropriate command word is parsed, which
in turn returns instances of AddPhotoCommand and DeletePhotoCommand respectively.
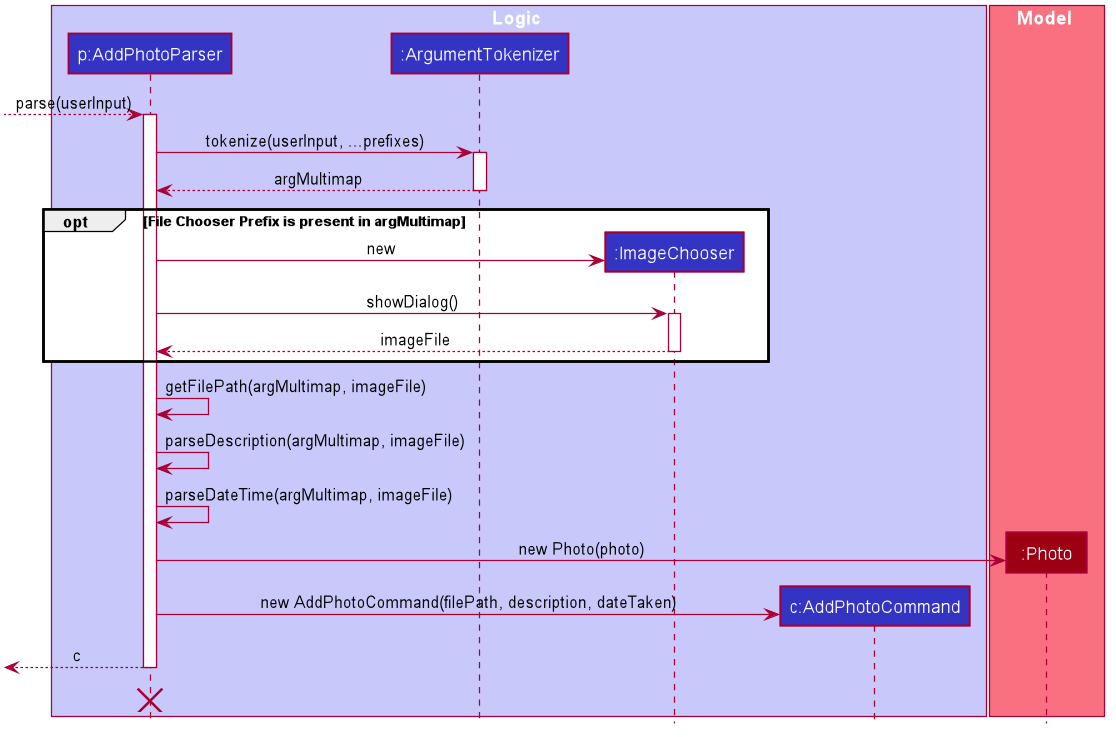
Logic aspect 1: Adding photos (through command line file path or os file chooser)
Following DiaryParser returning an instance of AddPhotoParser that calls parse() on the user specified arguments,
a number of operations happen, as per the UML sequence diagram below ([addphotoparser_parse_sequence_diagram]). The specifics of getFilePath,
parseDescription, parseDateTime are detailed further down below.
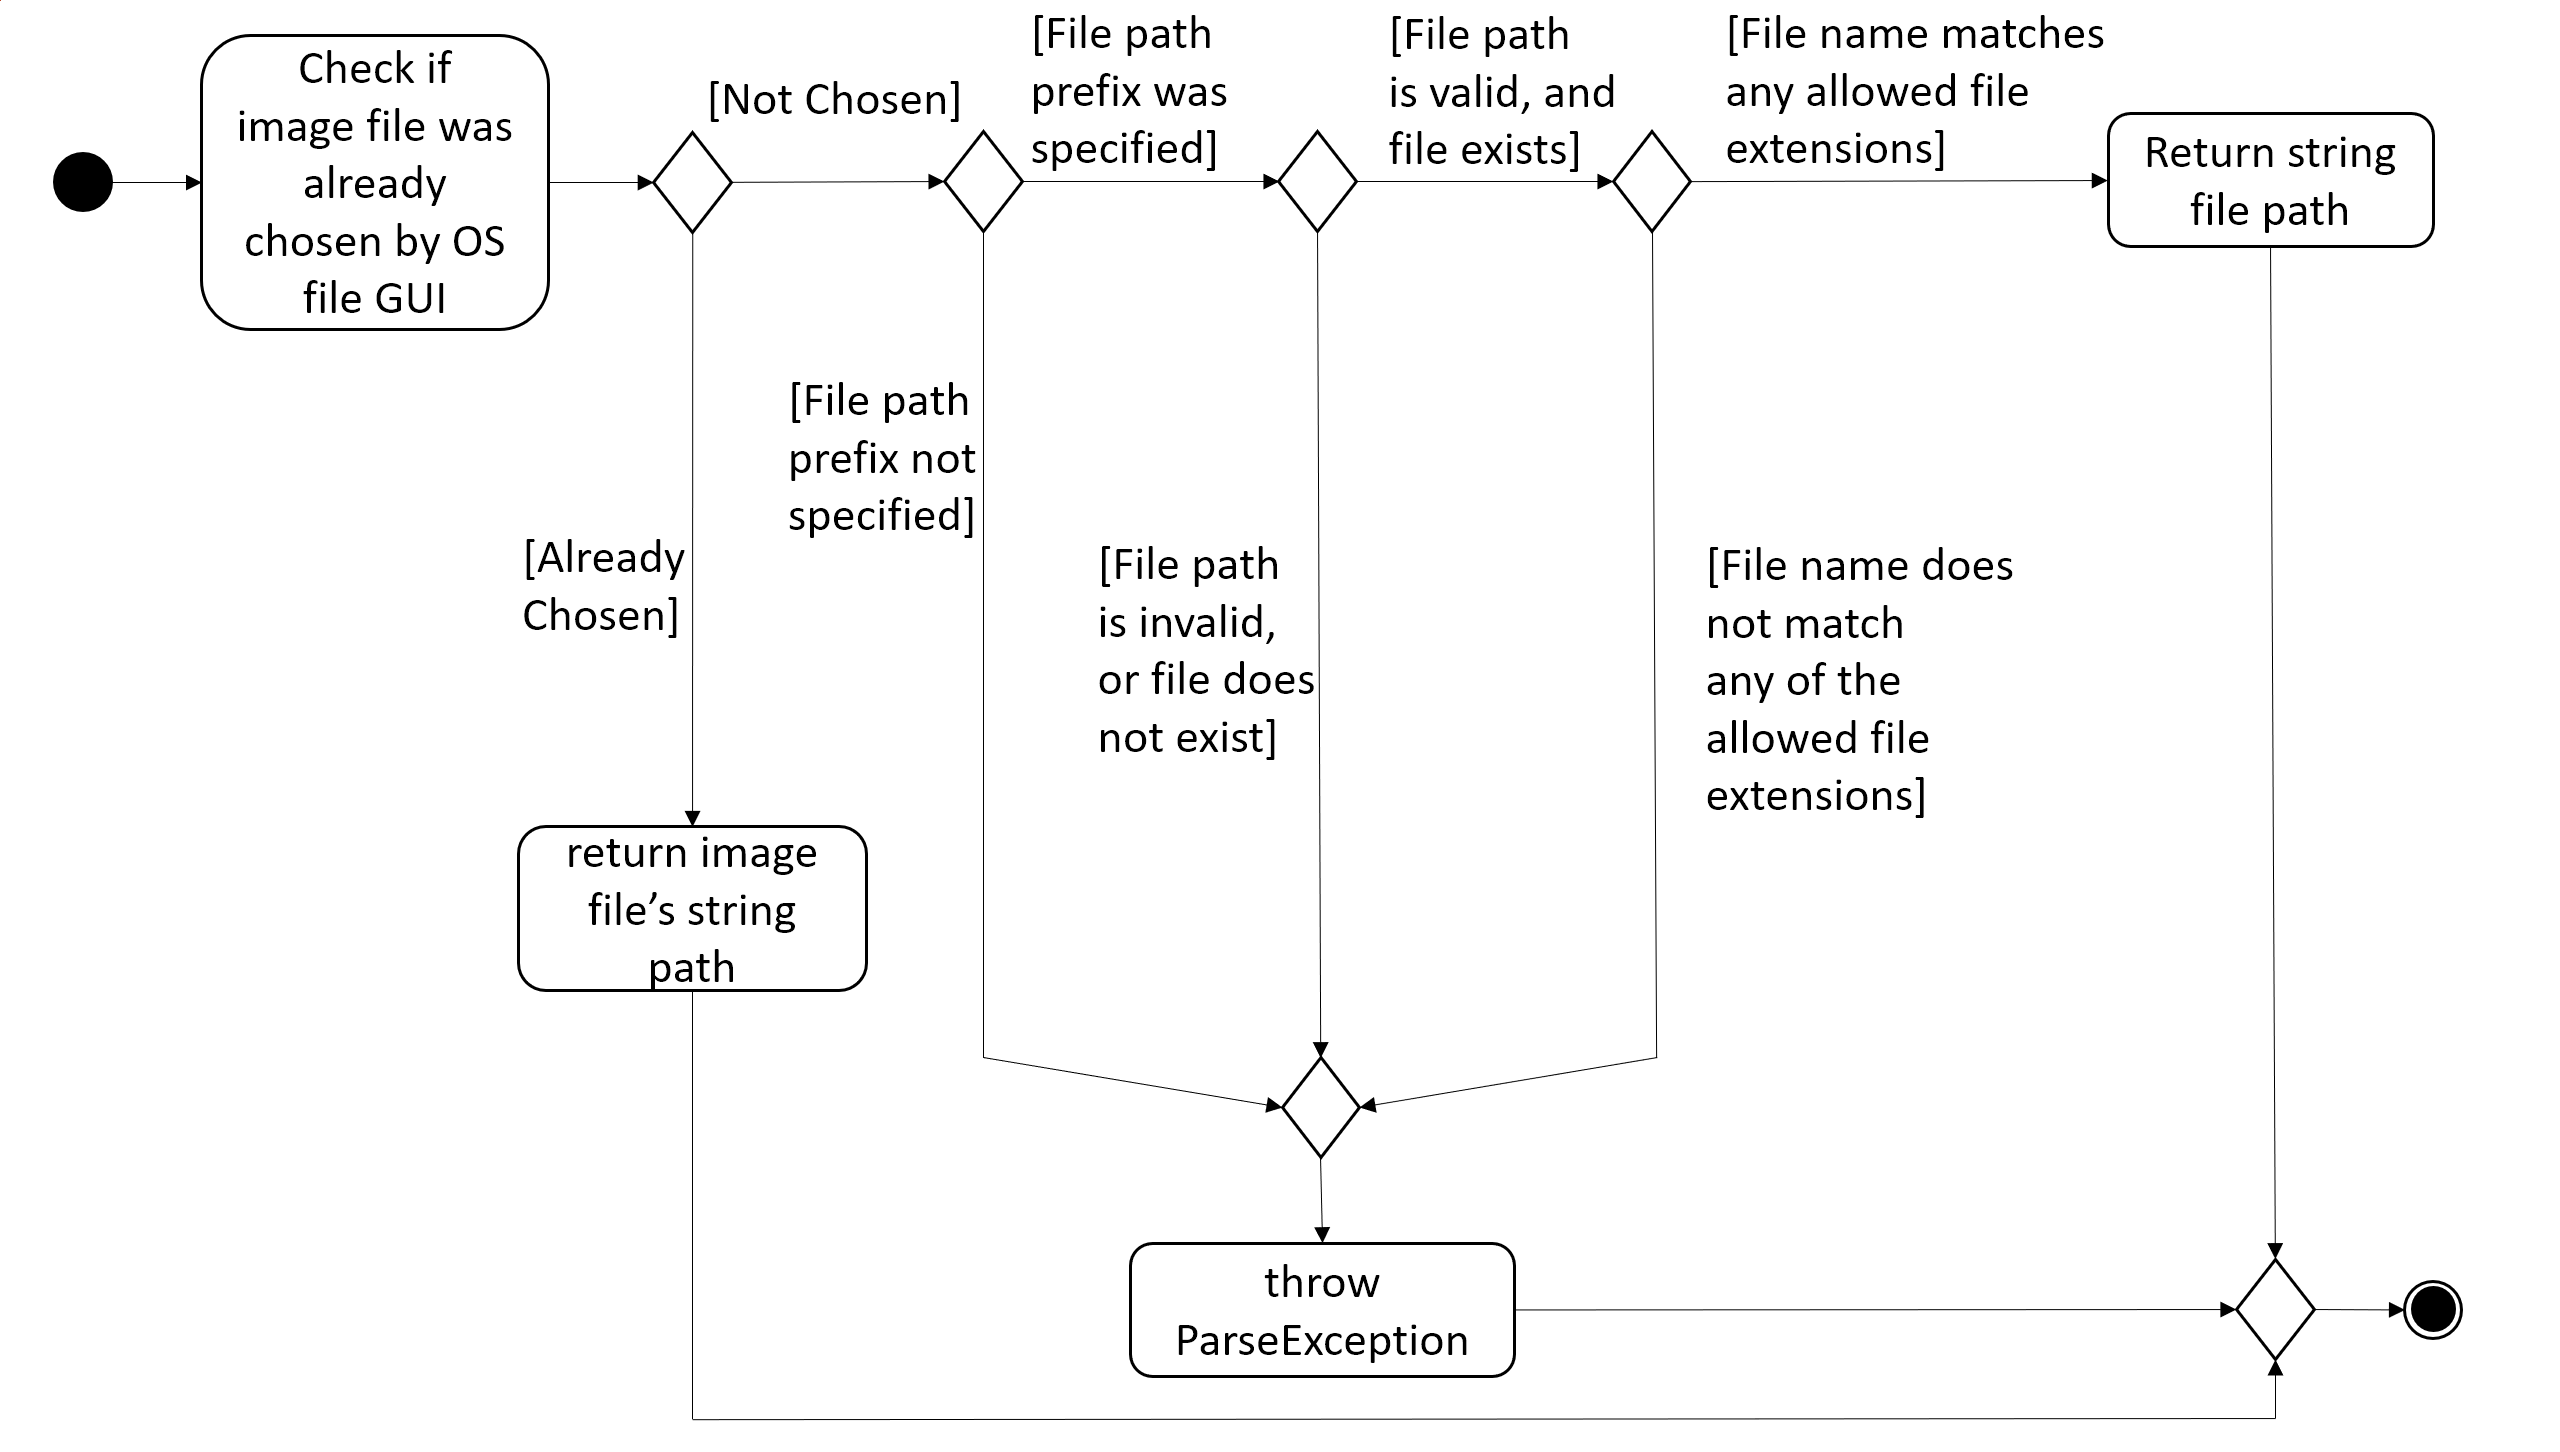
Parsing the image file path
-
Using
ArgumentMultimap, the file chooser prefix,fc/, is checked for. If present, the OS file choosing gui is opened usingImageChooser(a simple extension of JavaFX’sFileChooserenforcing image file extensions), and the data file path prefix is ignored. -
The
getFilePathsubroutine is then called, detailed in Figure 27, “Activity diagram of getFilePath subroutine”, which checks for the existence and validity of the image as supplied by theImageChooseror the file path in thefp/argument. -
If the
fc/was unspecified and the parsing process fails any of the checks,getFilePaththrows aParseException.
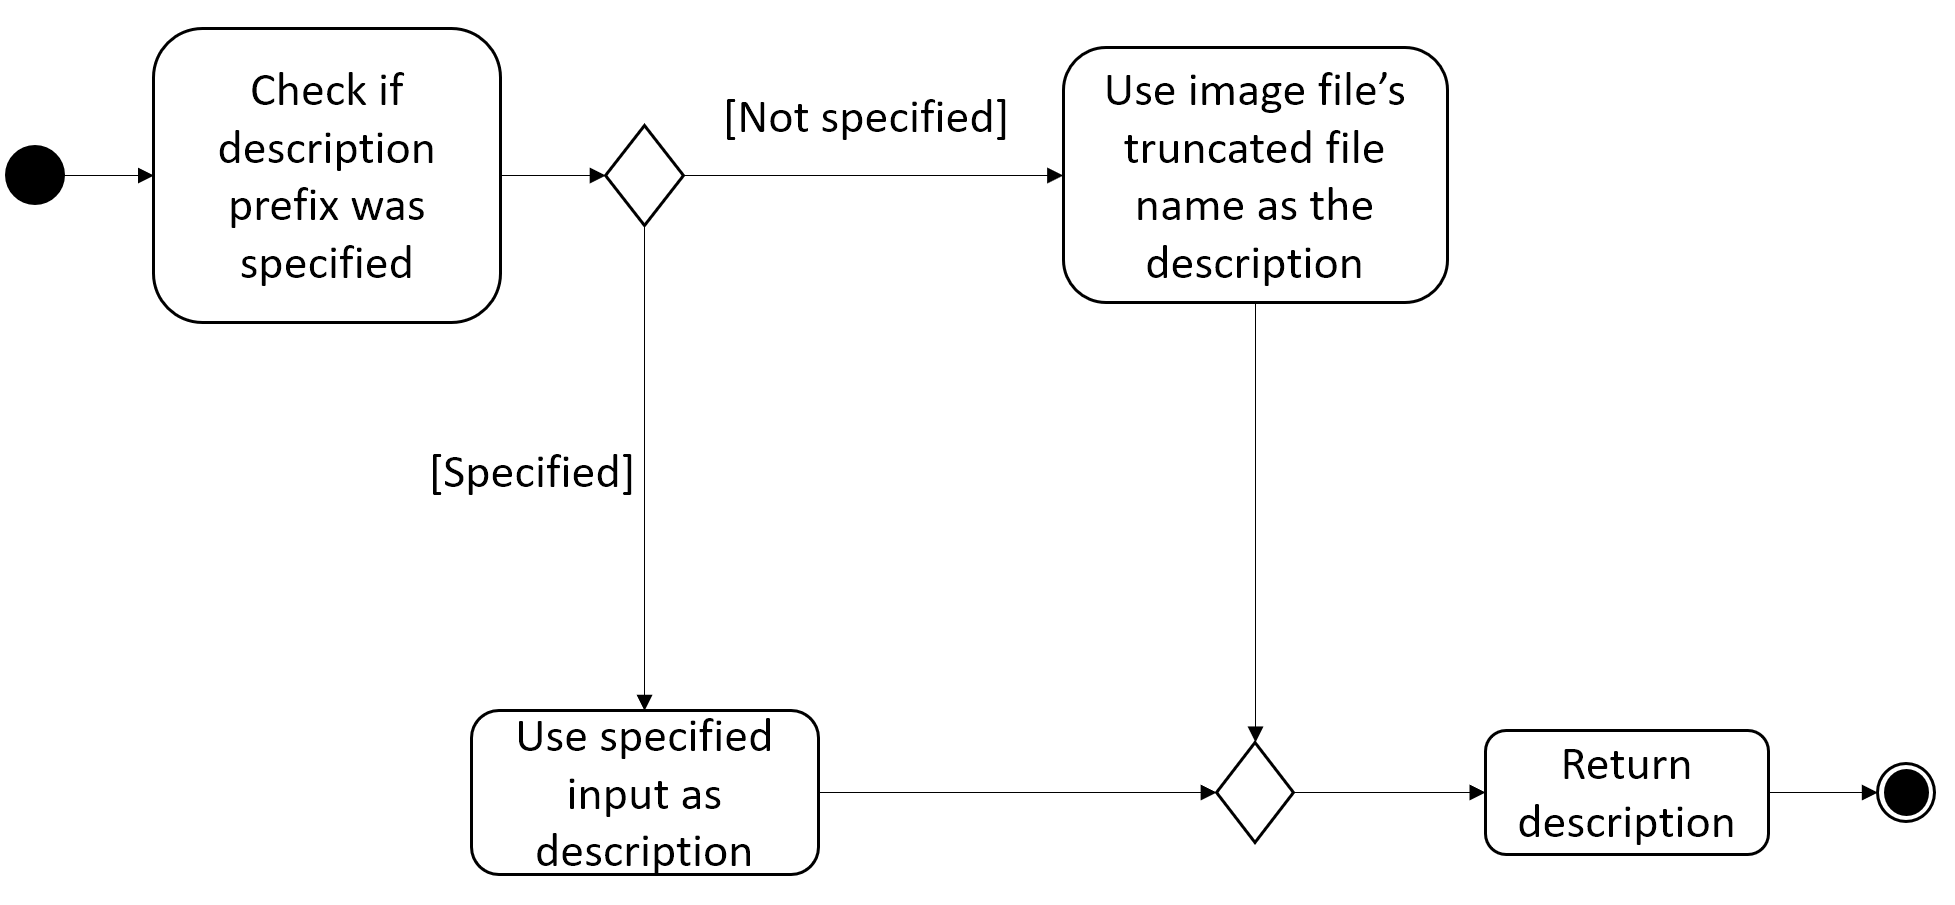
Parsing the description of the photo
-
If the description prefix is present,
AddPhotoParsertries to construct theDiaryPhotoinstance with the specified input. If validation of the description, as described in Section 3.8.1, “Aspect: Models” fails, then aParseExceptionis thrown during the instance construction. -
Otherwise, the file name of the validated file from Section 3.8.3.1.1, “Parsing the image file path” (truncated to match
DiaryPhoto’sdescription constraints) is used.
Parsing the date of the photo
-
If the date time prefix is present,
ParserDateUtilis used to parse the input as per the app level date formats. AParseExceptionis thrown in the case of date parsing failure, byParserDateUtil. -
Otherwise, the last modified date of the validated file from Section 3.8.3.1.1, “Parsing the image file path” is used.
The DiaryPhoto instance is then constructed, and passed to AddPhotoCommand which simply adds the DiaryPhoto to the
current PhotoList of the DiaryEntry.
Logic aspect 2: Deleting photos
Following DiaryParser parsing the 'delphoto' command from the user, an instance of DeletePhotoParser is created, which parses the received arguments.
-
The
DeletePhotoParsersimply parses the arguments for a valid integer, failing which aParseExceptionis thrown. -
An instance of
DeletePhotoCommandis then returned, which attempts a delete operation on the currentPhotoListof theDiaryEntrywith the specified index. ACommandExceptionis thrown to alert the user if the index was out of bounds.
3.8.4. Design considerations
| Feature | Alternative 1 | Alternative 2 |
|---|---|---|
Validation of image file path |
The first option is to implement the file path validation directly inside the This would have enforced a stricter level of validation on the image file path throughout the code, such as
if an instance of However, since the storage model for This secondary constructor would thus defeat the defensive benefit of implementing validation directly in the model. |
The second, chosen option, was to implement the file path validation inside the parser itself. Although this option limited the validation to only the 'addphoto' command, it allowed for leeway in
image path validation in other areas such as Moreover, Since the function for parsing the image file can and was abstracted into a single utility function, any other areas in future development needing this functionality can simply reuse this code. Overall, this leads to a more robust behaviour of the application, while providing the same level of extensibility as the first option. |
3.9. [Diary] Diary Entry Text Editing
The diary entry is capable of displaying text with inline images, or lines consisting of only images.
There are two primary facets of input styles to this feature, one being commands that edits a part or the whole of the entry through the command line input, and the other being the JavaFX text editor.
3.9.1. Aspect: Models
The main model abstraction holding the data of an entry is the DiaryEntry class.
It stores three key fields, namely:
1. An Index denoting the day the entry is for
2. A String written by the user in the domain specific language (see Section 3.9.2.1, “Entry text parsing”) required by the user interface.
3. A PhotoList storing the photos of the entry, as described in Section 3.8.1, “Aspect: Models”.
The DiaryEntry models are contained within a DiaryEntryList, which enforces the uniqueness of the Index (denoting the day index)
of each DiaryEntry, and supports common list operations.
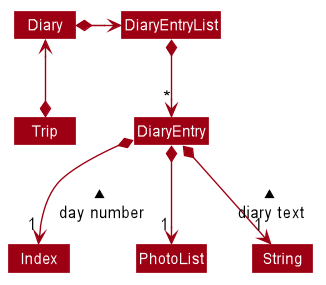
As one of the desired specifications of our application was to allow the user commands, and edits made directly to the edit box
to be non final until the done command is executed, a separate buffer model, EditDiaryEntryDescriptor, was needed to store the edit information.
This buffer model stores the same PhotoList and Index as the initial DiaryEntry it is constructed from,
but the diary text references a different String, that is, the buffered diary text String.
3.9.2. Aspect: User interface
Multiple UiPart components come into play in displaying the diary entry.
However, Page implementation (see Page Api) is still followed, and all components are thus contained within,
in one of DiaryPage’s placeholders.
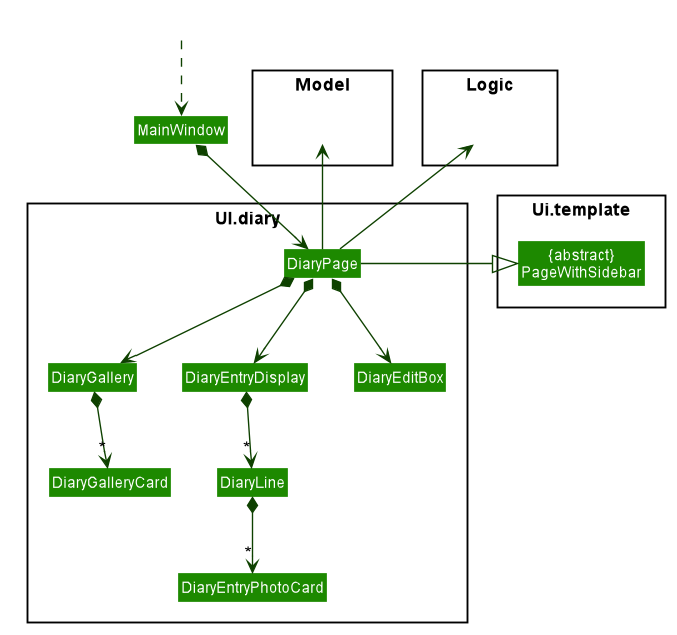
In the diagram above, all parts and subparts of the composition of DiaryPage extend from UiPart, although not shown.
|
The DiaryEntryDisplay is the component responsible for displaying the content of the DiaryEntry model.
Internally, it uses a JavaFX ListView<CharSequence> with a custom cell factory that
returns DiaryTextLineCell (as detailed in Section 3.9.2.1.3, “Graphic of ListView cells in DiaryEntryDisplay”). DiaryTextLineCells in turn uses the
DiaryLine UiPart as its graphic.
Entry text parsing
In both facets of input styles, special entry text parsing is required to display the various formats of lines, and dynamic text updates that occur when the text in the text editor is changed should propagate to the display immediately.
To accomplish this, the internal ListView is set to observe the paragraphs of the DiaryEditBox, which is done in the
constructor of DiaryEntryDisplay during the initialisation of DiaryPage.
The two facets of inputs dictate two separate ways the paragraphs can change.
1. Changes as a result of edits by the user in the text edit box
In this case, the edits to the TextArea input in DiaryEditBox are immediately propagated to the observable paragraphs, since the
ListView was set to observe the same list provided by DiaryEditBox.
2. Changes as a result of user commands
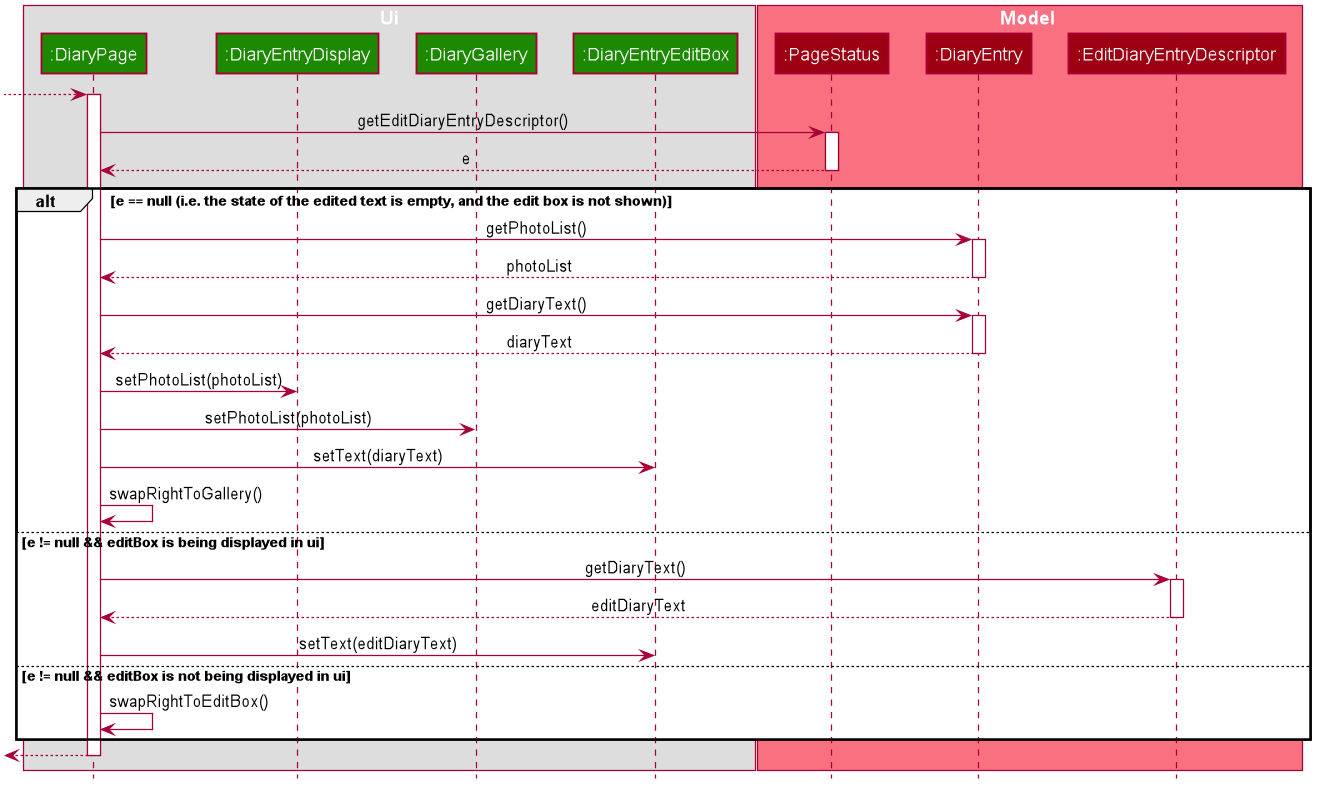
-
The
modelis updated, depending on whether the edit box is currently shown to the user.
1.1. The edited but uncommitted text stored in the currentEditDiaryEntryDescriptorwill be updated if the edit box is shown. (second branch in the diagram Figure 31, “Sequence diagram of updating of DiaryPage UI post command execution”)
1.2. Otherwise, the currentDiaryEntryin thePageStatusof themodelis updated immediately. (first branch in the diagram Figure 31, “Sequence diagram of updating of DiaryPage UI post command execution”) -
The text in the
DiaryEntryEditBoxis then refreshed with the updatedmodelin thefillPagecallback function executed byMainWindow(as per thePageapi), resulting in the changes reflecting in the observable paragraphs.
Graphic of ListView cells in DiaryEntryDisplay
The ListView of DiaryEntryDisplay uses a custom cell factory and cell implementation, that is, DiaryTextLineCell.
Once the data has been updated in the above two ways, the ListView receives the notification for which cell(s) to update.
The parsing is done in the inner class DiaryTextLineCell based on the text line received, using a
customised regex pattern. DiaryTextLineCell then creates new instances of DiaryLines
based on the parsed input, setting them as the graphic for the ListCell.
For DiaryLines with photos, the parsing process uses the photoList as set in the DiaryPage’s
fillPage method. (see branch 1 in Figure 31, “Sequence diagram of updating of DiaryPage UI post command execution”)
|
3.9.3. Design considerations
Numerous design decisions and comprimised had to be made due to the desired specifications of text editing and displaying.
Specifically, the following had to be achieved :
-
Changes to text in the
DiaryEntryEditBoxmust reflect immediately in theDiaryEntryDisplayto provide visual cue to the user. -
While the
DiaryEntryEditBoxis active, commands that edit the entry must behave like they edit theDiaryEntryEditBoxdirectly. That is, the changes should not be committed immediately. -
In general, where mentioned below, performance was favoured because of how a singular diary line can present both multimedia and text to the user, which puts a considerable strain on the system.
| Aspect | Option | Implementation |
|---|---|---|
Updating of UI |
1 |
The first option was to abide by the However, this implies updating all Alternative 2 attempts to solve this performance bottleneck. |
2 |
The second option, was to implement the diary text in For user commands, this solves the problem posed by alternative 1, since user commands can make edits only where needed in
the However, this meant that user edits to the Hence, one solution was to add a separate listener to the |
|
3 |
The last option was to set the Edits to the paragraphs in the On the other hand, edits using commands would reflect in the UI through setting the text
of the A hybrid solution built upon alternatives 2 and 3 was also considered, in that the
Having considered the performance impacts of alternatives 1 and 2, and the desired specifications of the application, the chosen solution was thus alternative 3. |
|
High level composition of |
1 |
The first solution to was to make Although it supports various apis to format and position text, displaying multimedia with it required
complex parsing logic of the Moreover, the parsing would be re run on the entire text of the |
2 |
The second solution is to use a wrapper ( On one hand, this increases extensibility, as the the graphic of a Secondly, |
3.10. [Inventory] The Inventory List
In the application, there can be two types of Inventory Lists:
1. Overall Trip Inventory List
An overall trip inventory list is the inventory list of all the items the user needs for the trip.
Each trip only has one overall trip inventory list.
2. An Event inventory list
An event inventory list is the inventory list of all the items the user needs for the event.
Each trip can have mutiple event inventory lists.
Therefore, in a trip, all the events inventory lists are subsets of one overall trip inventory list.
3.10.3. Aspect : Model
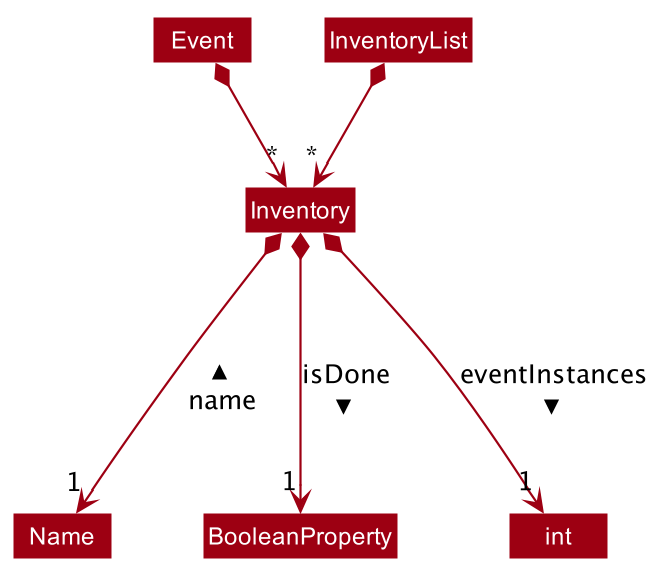
Event, and its contained modelsInventory
The model for an inventory item stored in memory is stored in the Inventory class.
It contains three attributes: the name, isDone and eventOccurances. The name attribute is implemented using a
custom built Name class which ensures that the name is valid. isDone was implemented using a BooleanProperty and indicates
whether the inventory item has been packed. While, eventInstances is an integer which represents the total number of
Event models that have the same inventory item.
Event
Inventory models are contained within an Event, if the corresponding inventory items are part of an event. Event stores
the Inventory models in an ArrayList. Therefore, each Event model contains an Event Inventory List (as defined above).
Since, currently, the application does allow the user to alter the 'isDone' toggle of an Inventory model contained in an event,
the isDone attribute is never set once it is is initialised (as false).
Furthermore, as the eventInstances attribute is only relevant to the Overall Trip Inventory List, the eventInstances
attribute is set as -1.
InventoryList
All unique (by name) Inventory models in any Event model is contained within an InventoryList. It stores the inventory items in a
JavaFX ObservableList. Therefore, the InventoryList contains the Overall Trip Inventory List (as defined above).
An ObservableList was chosen as the user interface requires the changes in the inventory list to be displayed instantly. Furthermore,
isDone was implemented using a BooleanProperty instead of a simple boolean to instantly detect and display changes in any inventory item’s isDone value.
Additionally, an InventoryList can also contain miscellaneous inventory items (not contained in any event).
3.10.4. Aspect : User Interface of Overall Trip Inventory List (with Model InventoryList)
The Overall Trip Inventory List (with Model InventoryList) is displayed in the TableView<Inventory> of the InventoryPage, as seen in the object diagram:
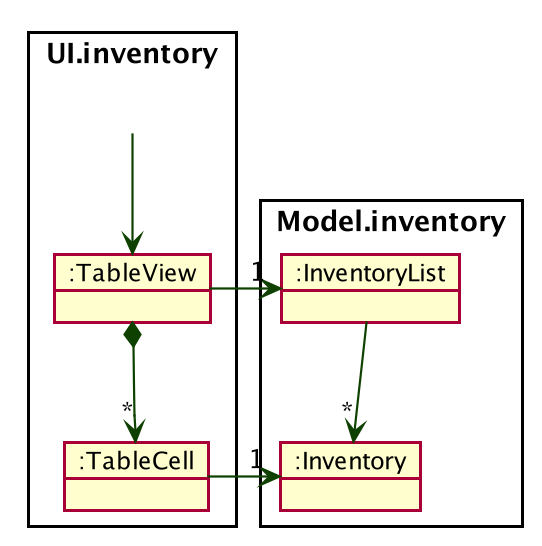
InventoryPage (not shown)The TableView has 3 columns. The first column numbers the items. The second column displays the item’s name. And the thrid column displays whether the item’s isDone property is true or false (through a checkbox).
Both the first and the second column’s cellValueFactory were set to new PropertyValueFactory(STRING) with String STRING. However, the third column was set to CheckBoxTableCell.forTableColumn(BOOLEAN) with Boolean BOOLEAN.
3.10.5. Aspect : User Interface of Event Inventory List (with Model Event)
The Event Inventory List (with Model Event) is displayed in the ListView<Inventory> of the EventPage, as seen in the object diagram:
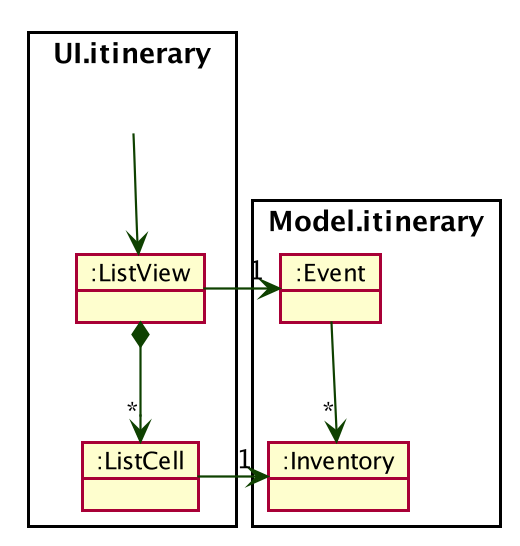
EventPage (not shown)The ListView uses the CSS styling of resources/view/Inventory/InventoryListViewTheme.css' by calling `listView.getStylesheets().add(CSS_FILE_PATH) with the File Path CSS_FILE_PATH)
Furthermore, the reason why ListView and ListCell are in package Ui.itinerary is because EventPage is in itinerary Ui.itinerary. Similarly, Event is in package Model.itinerary
3.10.6. Aspect : Logic of adding item to Overall Trip Inventory List (with Model InventoryList)
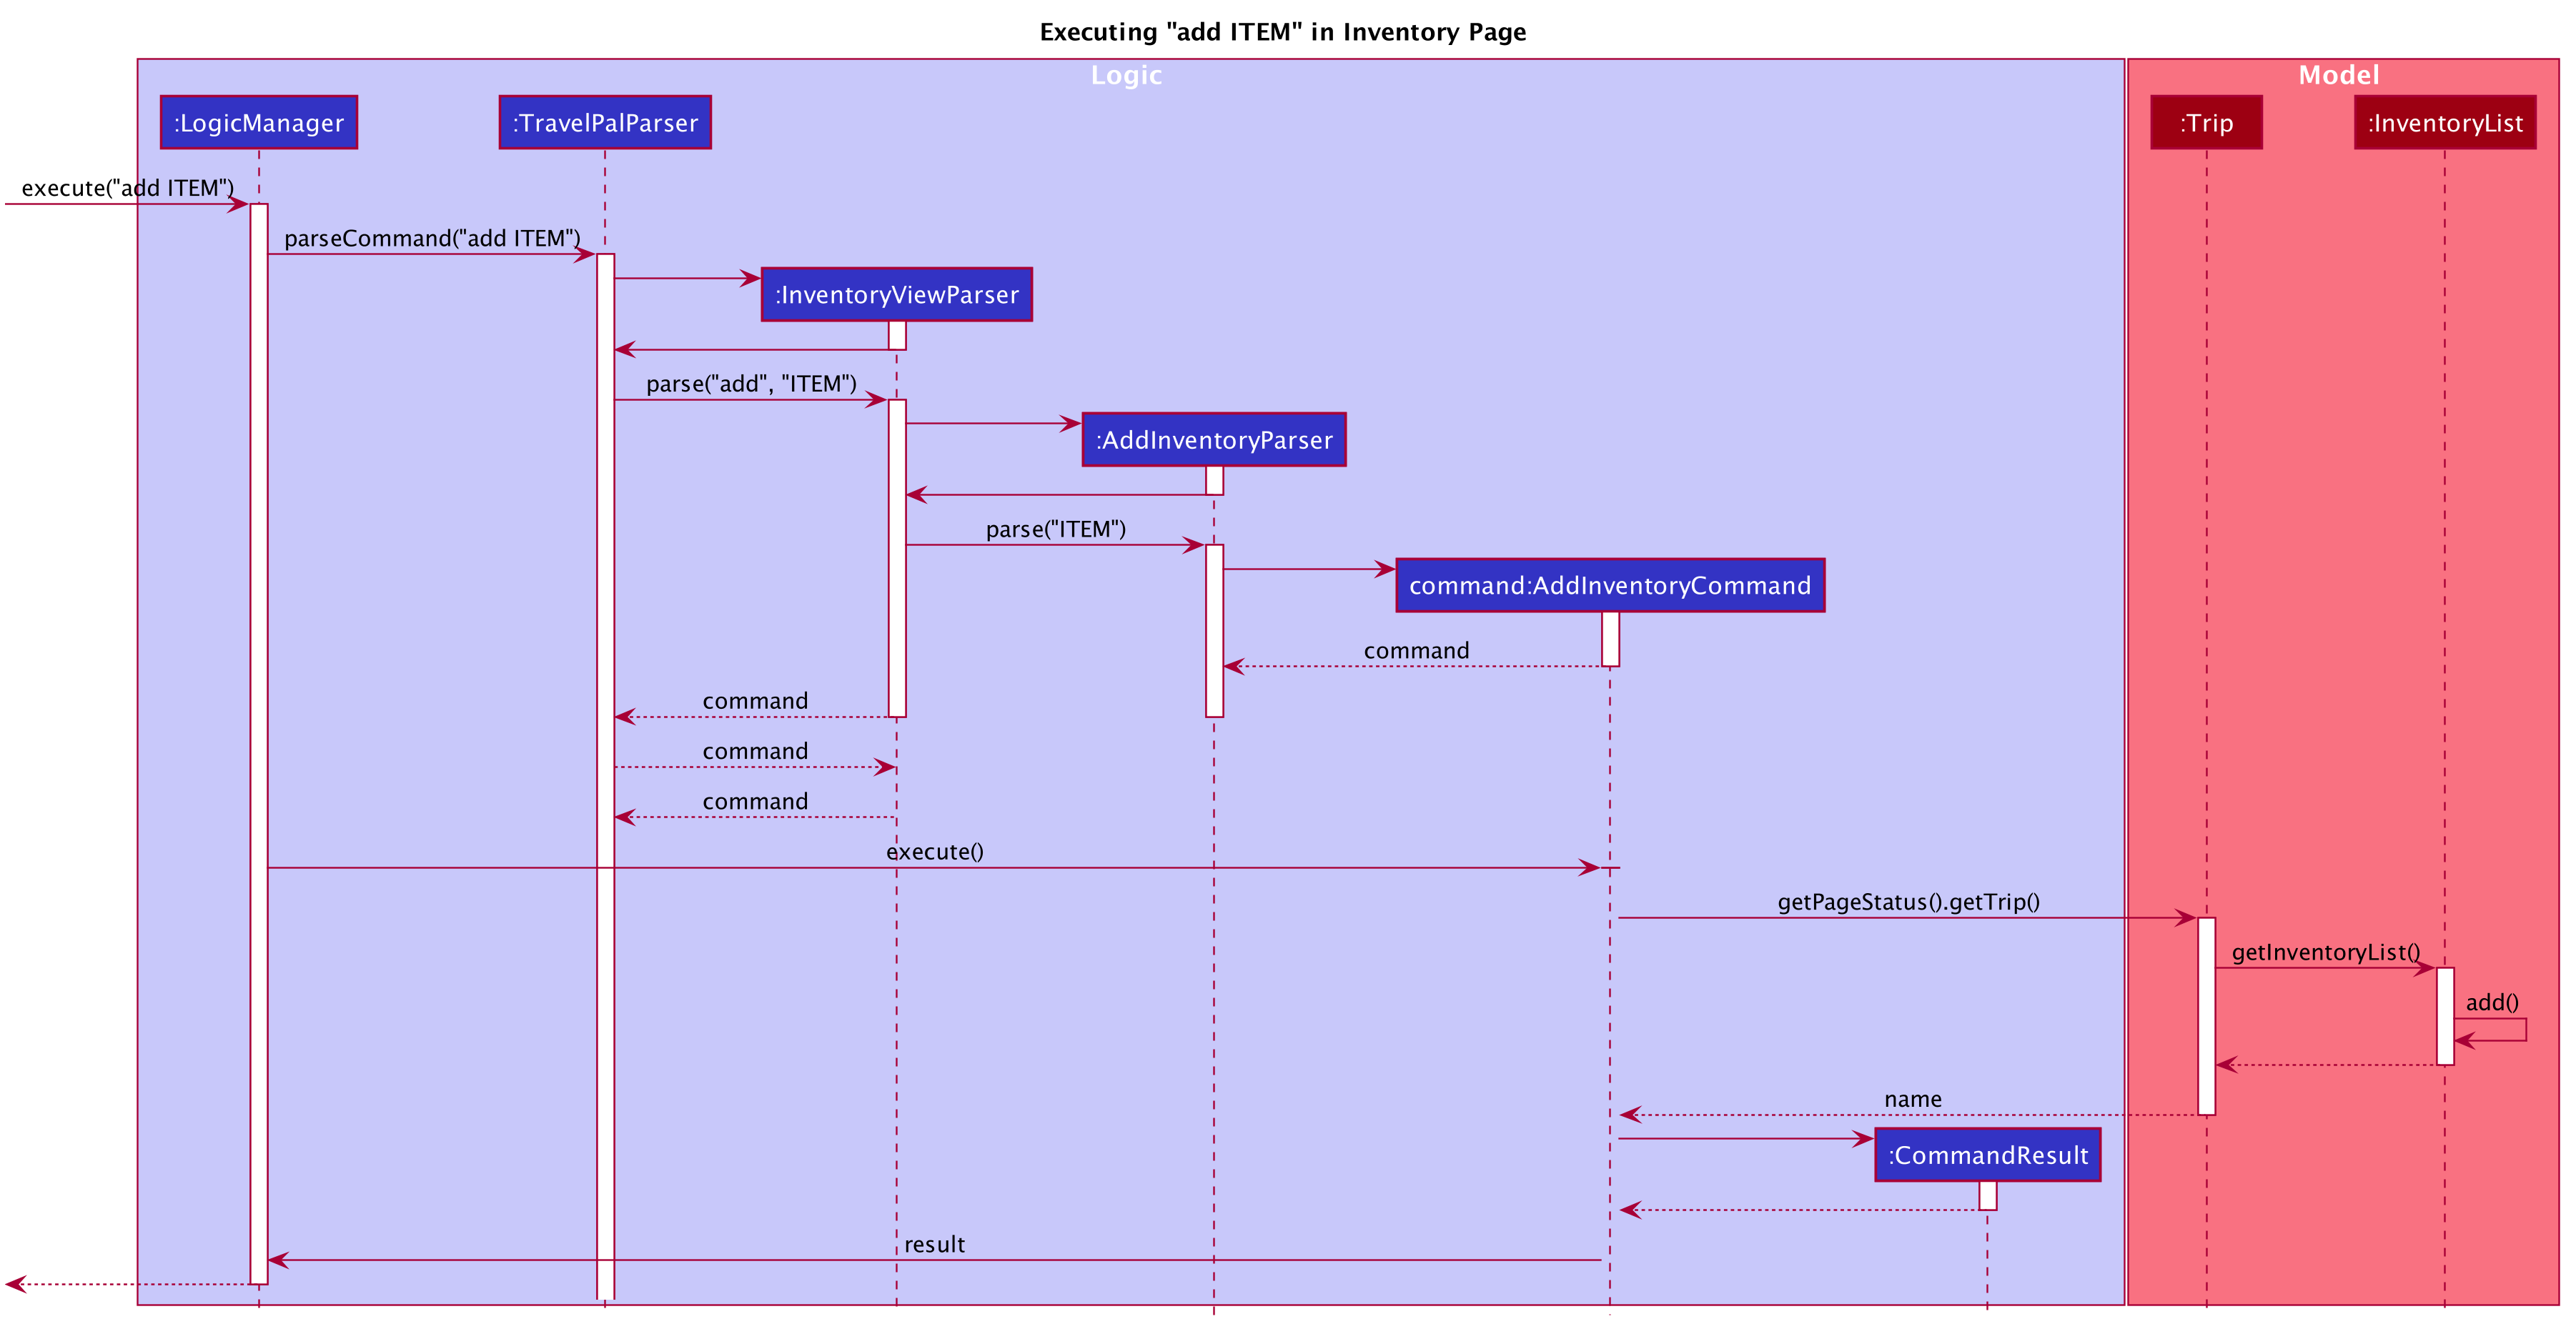
From the sequence diagram, it can be observed that only if InventoryViewParser and AddInventoryParser returns a Command, will
the Command be executed. This ensures the AddCommand is only executed when intended.
Moreover, as seen from the sequence diagram, whenever the AddInventoryCommand is executed, it will always return the InventoryView that
corresponds to the Trip that the user is correctly on - ensuring that there is only one Overall Trip Inventory List.
Furthermore, the InventoryList calls its own internal function of add to add an item to its list - which loops through the entire
list to make sure that the item to be added does not already exist - otherwise it does not add it
. Therefore, this also allows all the items in InventoryList to be unique.
3.10.7. Possible Improvement in Future Release
Currently, both the Event Inventory List and the Overall Trip Inventory List utilise a common Inventory class to store
inventory items.
However, an inventory item in the Event Inventory List does not need to keep count of the eventInstances attribute. Although, the
current solution of setting eventInstances to -1 allows both classes to share the Inventory class, it might not be scalable and
there may lead to bugs in the future.
Therefore, in a future update, it would be rational to remove make the Inventory class an abstract class with just a Name attribute.
And have 2 different classes extend it for the 2 different use cases.
3.11. Logging
We are using java.util.logging package for logging. The LogsCenter class is used to manage the logging levels and logging destinations.
-
The logging level can be controlled using the
logLevelsetting in the configuration file (See Section 3.12, “Configuration”) -
The
Loggerfor a class can be obtained usingLogsCenter.getLogger(Class)which will log messages according to the specified logging level -
Currently log messages are output through:
Consoleand to a.logfile.
Logging Levels
-
SEVERE: Critical problem detected which may possibly cause the termination of the application -
WARNING: Can continue, but with caution -
INFO: Information showing the noteworthy actions by the App -
FINE: Details that is not usually noteworthy but may be useful in debugging e.g. print the actual list instead of just its size
3.12. Configuration
Certain properties of the application can be controlled (e.g user prefs file location, logging level) through the configuration file (default: config.json).
4. Documentation
Refer to the guide here.
5. Testing
Refer to the guide here.
6. Dev Ops
Refer to the guide here.
Appendix A: Product Scope
Target user profile:
-
Has a need to manage multiple trips
-
Prefers using a notebook to other types
-
Frequently uses the computer while overseas
-
Wants to micromanage all parts of their trips
-
Wants to plan all details of the trip before leaving
-
Wants to manage a trip even without an internet connection
Value proposition: Able to micromanage a trip and access one’s plans more conveniently than traditional forms of trip planning

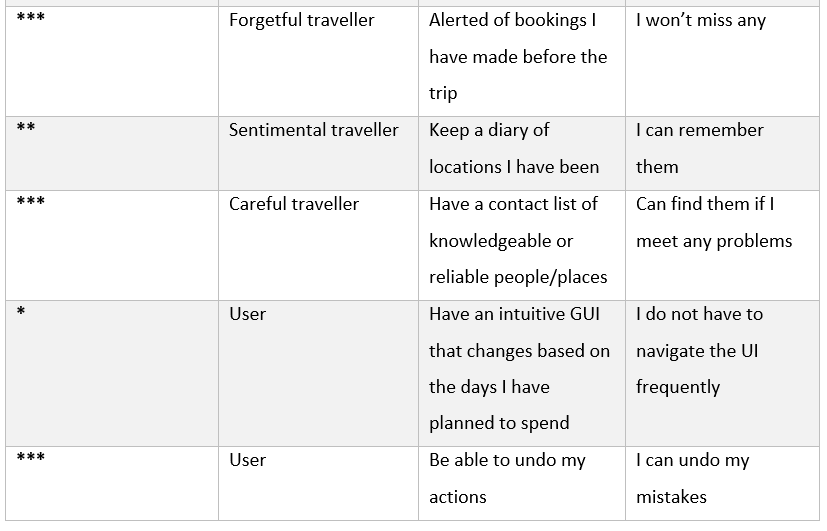
Appendix C: Use Cases
-
Use case: UC1 - Add Trip
-
MSS
-
User requests to Trip Manager to list trips
-
TravelPal shows a list of Trips
-
User requests to add a specific Trip to the list
-
User edits the Trip ([UC2])
-
TravelPal adds the Trip
-
TravelPal shows the list of Trips.
-
-
Use case ends.
-
Extensions
-
5a. The trip added clashes with another trip
-
5a1. TravelPal shows an error message
-
5a2. TravelPal does not discard information the user has provided
-
5a3. TravelPal displays the Edit Trip page containing the user’s previous input
-
5a4. TravelPal requests the user to change the dates of the Trip
-
Steps 5a1-5a2 are repeated until no clashes occur between trips
-
-
Use case: UC2 – Edit Trip
-
MSS
-
User chooses to edit specific Trip
-
Travelpal shows Edit Trip Screen with fields to edit/enter
-
User edits the information in the specified Trip
-
User submits the details and confirms the edit.
-
-
Use case ends.
-
Extensions
-
3a. User enters an invalid field
-
3a1. TravelPal shows an error message
-
3a2. TravelPal does not edit invalid field
-
Use case continues at step 2
-
-
3b. User requests to list of Days in the trip
-
4b. User leaves necessary information empty
-
4b1. TravelPal shows an error message
-
4b2. TravelPal does not submit the details and does not confirm the edit
-
4b3. User enters new data
-
Steps 4a1-4a3 are repeated until the data entered are non empty
-
Use case ends.
-
-
-
Use case: UC3 – Delete Trip
-
MSS
-
User requests to Trip Manager to list Trips
-
TravelPal shows a list of Trips
-
User requests to delete a specific Trip in the list
-
TravelPal deletes the Trip
-
-
Use case ends
-
Extensions
-
2a. The list is empty
-
Use case ends
-
-
3a. The Name provided is invalid
-
3a1. TravelPal shows an error message
-
3a2. TravelPal does not delete any trips
-
Use case ends
-
Use case: UC4 – Add Day
-
MSS
-
User chooses to add a Day to a specified Trip
-
User edits the day (UC5)
-
TravelPal saves the Day
-
-
Extensions
-
3a. Day added clashes with other days in the Trip
-
3a1. TravelPal shows an error message
-
3a2. TravelPal does not discard information the user has provided
-
3a3. TravelPal displays the Edit Day page containing the user’s input
-
3a4. TravelPal requests the user to change the date of the Day
-
Steps 3a1 – 3a4 are repeated until the user provided non clashing date
-
-
-
Use case: UC5 – Edit Day
-
MSS
-
User requests to edit specific Day
-
TravelPal shows the Edit Day page with fields to enter
-
User edits information in the specified Day
-
User submits and confirms the edit
-
-
Use case ends
-
Extensions
-
3a. User enters an invalid field
-
3a1. TravelPal shows an error message
-
3a2. TravelPal does not edit invalid field
-
Use case continues at step 2
-
-
3b. User requests to list of Events in the trip
-
3b1. TravelPal shows a list of Events to the user (can be empty)
-
3b2. User chooses to add/edit/delete (UC 7/8/9) Event
-
Use case continues at step 4
-
-
4b. User leaves necessary information empty
-
4a1. TravelPal shows an error message
-
4a2. TravelPal does not submit the details and does not confirm the edit
-
4a3. User enters new data
-
Steps 4a1-4a3 are repeated until the data entered are correct
-
Use case ends.
-
-
-
User case: UC6 – Delete Day
-
MSS
-
User requests to delete a specific Day in the list
-
TravelPal deletes the Day
-
-
Use case ends
-
Extensions
-
2a. The list is empty
-
Use case ends
-
-
3a. The Name provided is invalid
-
3a1. TravelPal shows an error message
-
3a2. TravelPal does not delete any Day
-
Use case ends
-
-
-
User case: UC7 – Add Event
-
MSS
-
User chooses to add a Event to a specified Day
-
User edits the event (UC5)
-
TravelPal saves the Event
-
-
Extensions
-
3a Event added clashes with other Events in the Day
-
3a1. TravelPal shows an error message
-
3a2. TravelPal does not discard information the user has provided
-
3a3. TravelPal displays the Edit Event page containing the user’s input
-
3a4. TravelPal requests the user to change the date of the Event
-
Steps 3a1 – 3a4 are repeated until the user provided non clashing date
-
-
-
-
User case UC8 – Edit Event
-
MSS
-
User requests to edit specific Day
-
TravelPal shows the Edit Day page with fields to enter
-
User edits information in the specified Day
-
User submits and confirms the edit
-
-
Use case ends
-
Extensions
-
3a. User enters an invalid field
-
3a1. TravelPal shows an error message
-
3a2. TravelPal does not edit invalid field
-
Use case continues at step 2
-
-
3b. User requests to list of Events in the trip
-
3b1. TravelPal shows a list of Events to the user (can be empty)
-
3b2. User chooses to add/edit/delete (UC 7/8/9) Event
-
Use case continues at step 4
-
-
4b. User leaves necessary information empty
-
4a1. TravelPal shows an error message
-
4a2. TravelPal does not submit the details and does not confirm the edit
-
4a3. User enters new data
-
Steps 4a1-4a3 are repeated until the data entered are non empty
-
Use case ends.
-
-
-
User case UC9 – Delete Event
-
MSS
-
User requests to delete a specific Event in the list
-
TravelPal deletes the Event
-
-
Use case ends
-
Extensions
-
2a. The list is empty
-
Use case ends
-
-
3a. The Name provided is invalid
-
3a1. TravelPal shows an error message
-
3a2. TravelPal does not delete any Event
-
Use case ends
-
-
Appendix D: Non Functional Requirements
-
Should work on any [mainstream OS] as long as it has Java 11 or above installed.
-
A user with above average typing speed for regular English text (i.e. not code, not system admin commands) should be able to accomplish most of the tasks faster using commands than using the mouse.
-
Should be able to hold up to 30 trips without a noticeable sluggishness in performance for typical usage.
-
A user familiar with travelling should be able to navigate the app easily
-
A novice user should be able to navigate without prior experience
-
Application does not depend on online resources to operate
Appendix E: Glossary
TravelPal – Our cross-platform desktop application for those who love to plan and micromanage their travels
CLI – Command Line Interface. CLI is a command line program that accepts text input to execute operating system functions.
GUI – Graphical User Interface. The graphical user interface is a form of user interface that allows users to interact
OS - An operating system, or "OS," is software that communicates with the hardware and allows other programs to run
Mainstream OS - Windows, Linux, Unix, OS-X
Use Cases (UC) - A description of a set of sequences of actions, including variants, that a system performs to yield an observable result of value to an actor
UML Class Diagrams - UML class diagrams describe the structure (but not the behavior) of an OOP solution.
Appendix F: Instructions for Manual Testing
Given below are instructions to test the app manually.
| These instructions only provide a starting point for testers to work on; testers are expected to do more exploratory testing. |
F.1. Launch and Shutdown
-
Initial launch
-
Download the jar file and copy into an empty folder
-
Double-click the jar file
Expected: Shows the GUI with a set of sample contacts. The window size may not be optimum.
-
-
Saving window preferences
-
Resize the window to an optimum size. Move the window to a different location. Close the window.
-
Re-launch the app by double-clicking the jar file.
Expected: The most recent window size and location is retained.
-
F.2. Deleting a Trip
-
Delete a trip
-
Prerequisites: Navigate to the Trip Page. Ensure there are at least one trip in the list.
-
Test case:
delete 1
Expected: The first trip in the list is deleted and all the cards have their index updated. -
Test case:
delete 0
Expected: No trip is deleted. Error message is displayed. -
Other incorrect delete commands to try:
delete,delete x(where x is larger than the list size) {give more}
Expected: Similar to previous. Error message shows the error committed.
-
-
Adding inventory item
-
Prerequisites: Navigate to the Inventory Page. Start with an empty list.
-
Test case:
add item
Expected: A new item with index following the last is added -
Test case:
delete 0
Expected: The first item in the list is deleted and indexes decrease by one to match the change -
Other incorrect delete commands to try:
delete,delete x(where x is larger than the list size) {give more}
Expected: Similar to previous. Error message show sthe error committed.
-