About the project
My team of 4 software engineering students and I were tasked with enhancing a basic command line interface desktop addressbook application for our Software Engineering project. We chose to morph it into a travel management application called TravelPal. This application allows travellers to micromanage their travels, including features like expenditure and inventory managing.

My main role was to design the itinerary feature which allows user to view and manage all parts of their trip. The following sections illustrate these enhancement in more detail, as well as relevant documentation I have added to the user and developer guides in relation to these enhancements.
symbol legend
Summary of contributions
This section shows a summary of my coding, documentation, and other helpful contributions to the team project. Our application is a multipage application and features were split by assigning each individual page(s) to develop.
-
Main Major Contribution: Itinerary Feature
-
What it does: The Itinerary Feature consists of 2 parts - 1. Itinerary Management and 2. Itinerary Administration
-
Itinerary Management: Responsible for displaying user data and redirecting users to relevant portions of the app.
-
Itinerary Administration: Responsible for letting users create their customized trips and synchronizing them with other’s they have created.
-
-
Justification: TravelPal has several layers of specification and requires an intuitive way for users to manage their trips. This feature divides the management of trips into different parts so the user’s purview of the application is limited to only the most necessary.
-
Highlights: Since itinerary feature is the main way users access the data they have input, it includes ways to create/edit/display information from other features. Tough design considerations had to be made so the code base was easily understandable and accessible for other teammates to use.
-
-
Second Major Contribution: Feature Integration
-
About: Following from the Itinerary feature being the main mode of accessing and viewing a user’s trip information, I was also responsible in integrating the various other features (e.g. Booking Manager, Inventory Manager and Expense Manager)
-
Justification: Integrated features ensures user friendliness. In this case changing information/statuses in other parts of TravelPal should change its display in all other facets the app so the user doesn’t have to do so manually.
-
Highlights: The main challenge in integration is the changing specifications throughout the development of TravelPal. Discussions on changing existing specifications and addition of new ideas not in the original design requires extensive maintenance and changing newly broken tests.
-
-
Third Major Contribution: Refactoring Code Base
-
About: Refactored the
ModelandStoragecomponents from the original AddressBook 3 application. -
Justification: The Address Book base application was different from our intended design and required modifications before each feature could be properly implemented
-
Highlights: The major positive challenge in refactoring the code base was the coordination between team members. Since each component rely on each other to function correctly, we had to communicated our needs and wants effectively to ensure we do not negatively affect another components refactoring negatively.
-
-
Code contributed: [Functional code] [Test code]
-
Other contributions:
-
Community
-
Reviewed Pull Requests: [My reviews]
-
Assigned and closed issues:
-
Bug related: [Discussion, assignment and closure of issues]
-
Team task related: [Issues]
-
-
-
Enhancement to existing features
-
Tools
-
Integrated Travis to the project
-
Integrated GitHub Pages into the project
-
-
Documentation
-
Contributed all Appendixes in the Developer’s Guide_ [Appendixes]
-
Contributed the Trip Manager user guide [Trip Manager Guide]
-
-
Contributions to the User Guide
Below is an excerpt from our TravelPal user guide authored by me. This section is about creating Trips in TravelPal and showcases my ability to write user friendly and thorough documentation for end users.
Trip setup
Trip setup is the first step in configuring a new/existing trip! This requires you to be at the Trip Manager page (the landing page).
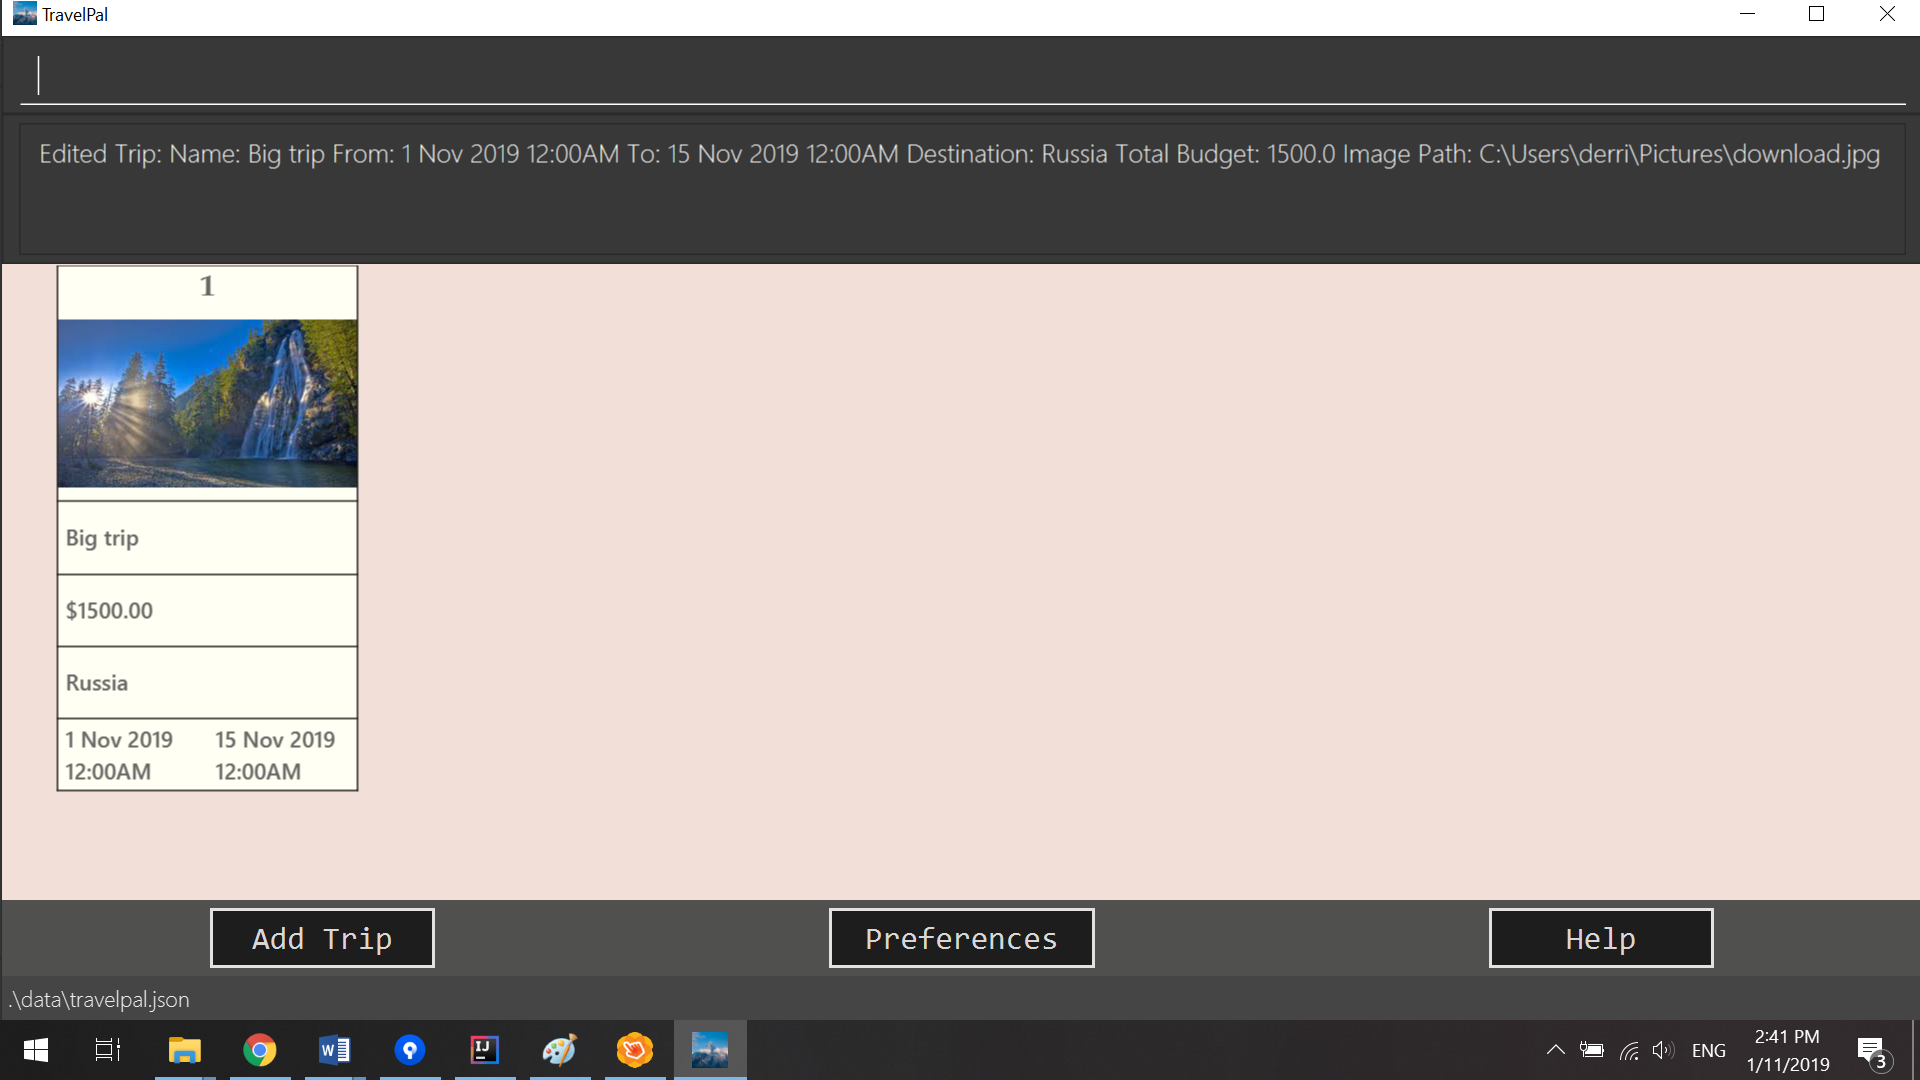
Step 1: Now you can enter the command create or edit <index> to create a new trip or edit an existing trip.
Upon commands to create or edit a specified trip from the Trip Manager, you will be directed to a page where they can edit the necessary details to create a new trip. This page will contain a form with 6 fields (optional fields are marked by italics):
-
Name: Name of the trip
-
Constraints: Names should only contain up to 40 alphanumeric characters and spaces, and it should not be blank
-
-
Start Date: Starting date of the trip
-
Constraints: Start date should be in the DD-MM-YY format
-
-
End Date
-
Constraints: End date should be in the DD-MM-YY format
-
-
Total Budget
-
Constraints: Budget can take any positive numerical value with no more than 2 decimal places, and it should not be blank
-
-
Destination
-
Constraints: Destination can take any values, and it should not be blank
-
-
Photo
-
Constraints: The image path specified should be valid, and must point to an existing file. Otherwise, a default image will be used.
-
| The last field Photo is an optional field, a default image will be used if the user does not submit any image. |
Step 2:
-
If the
createcommand was executed, you will be displayed an empty form with no details filled in. You will see the following page:
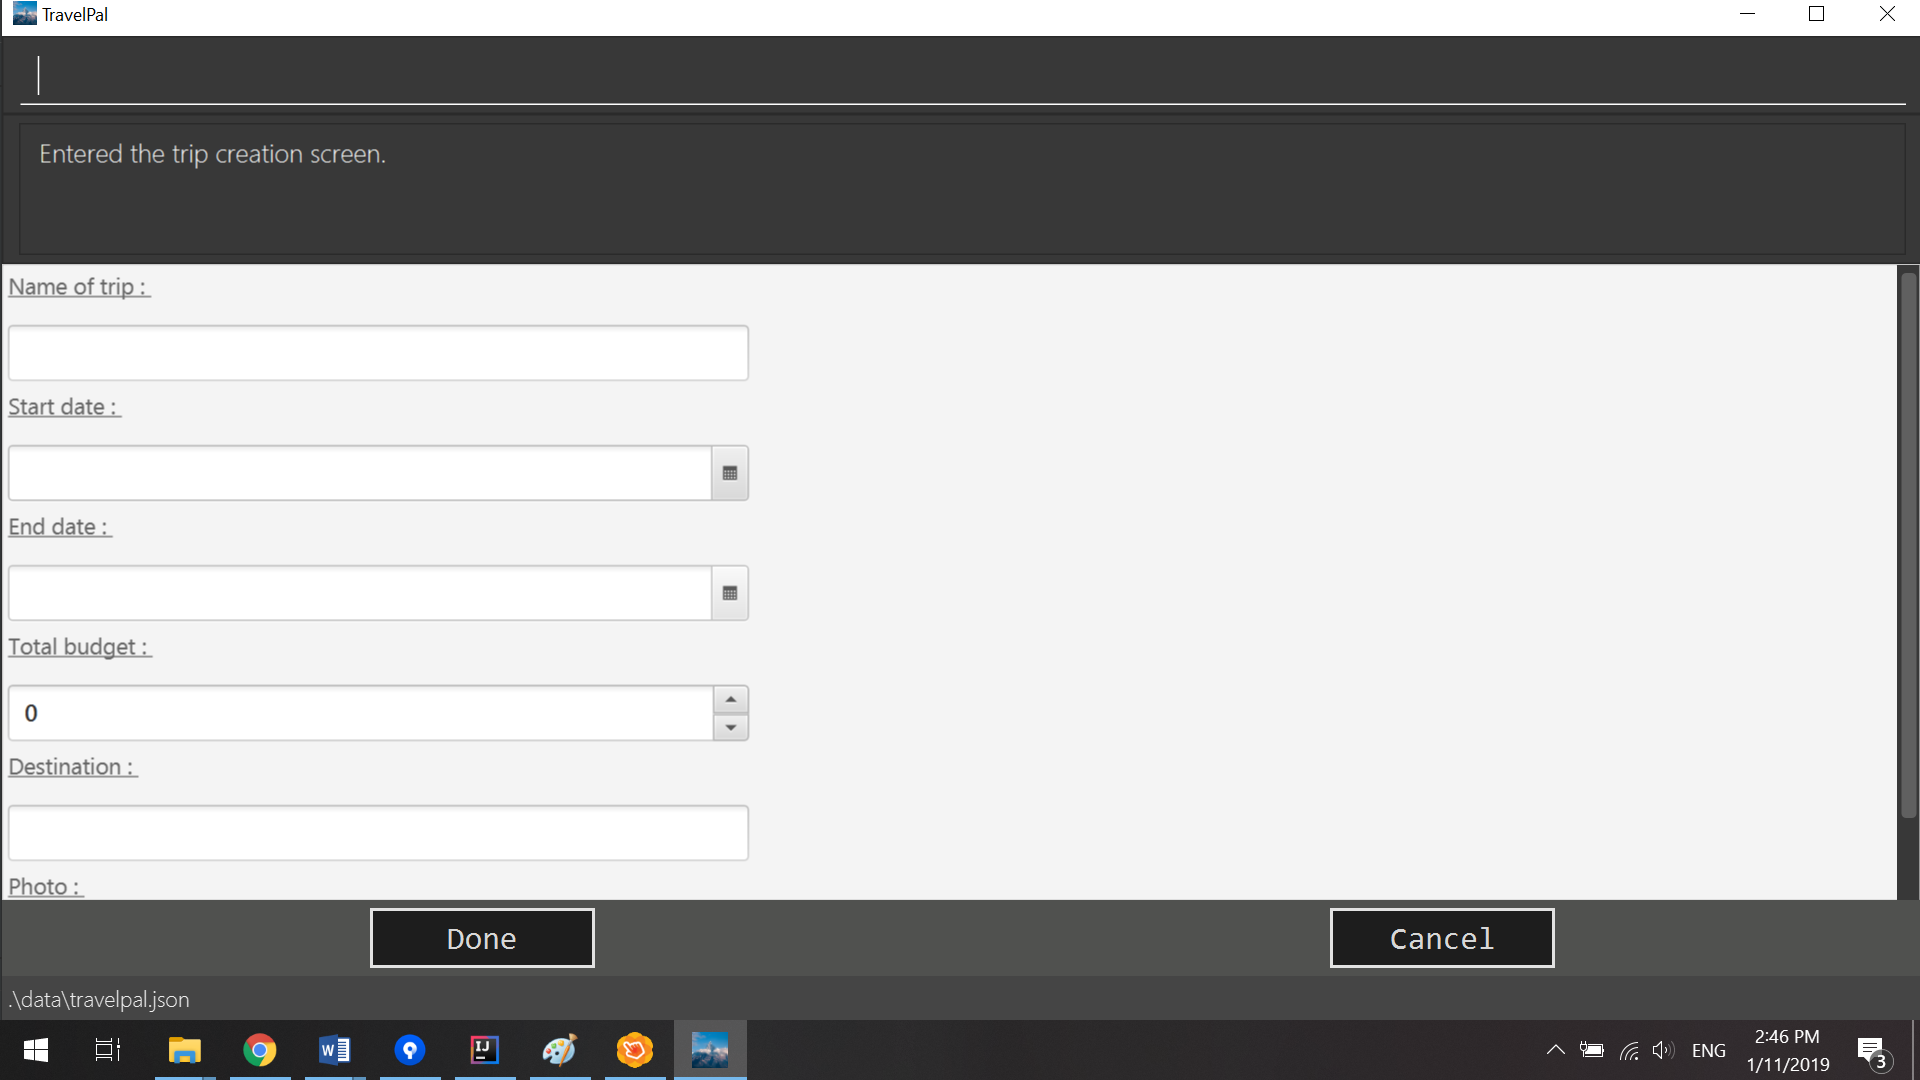
create command generates empty fields-
If the
editcommand was executed, you will be displayed a from with details previously filled in instead:
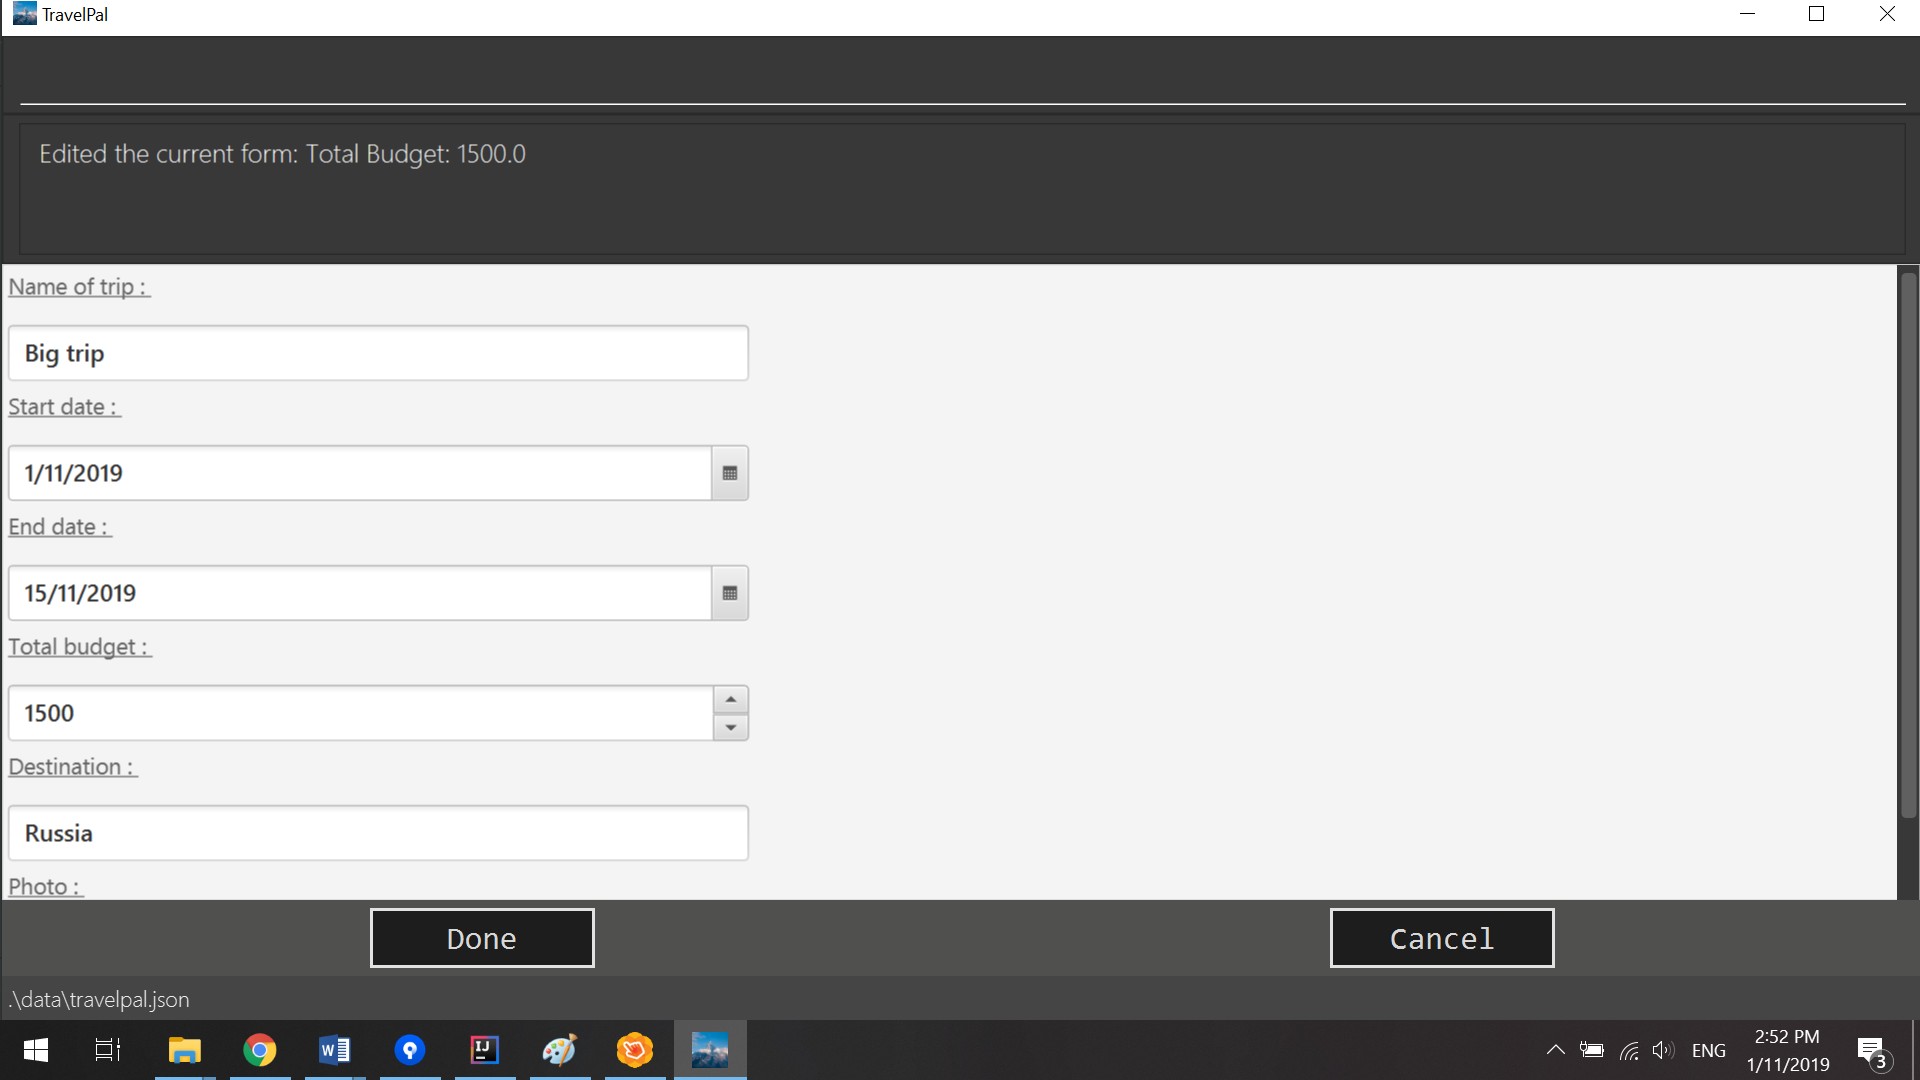
edit command generates fields from your previously saved dataStep 3: Now that you are on the edit page, to edit a specific field, execute the following command: edit <prefix>/<value> <prefix>/<value> …. There are 6 different prefixes. The 6 prefixes refer to editing each fields as follows:
-
Name :
n/ -
Start Date :
ds/ -
End Date :
de/ -
Total Budget :
b/ -
Destination :
l/ -
Photo File Path :
fp/
You can execute fc/ with fp/ to open a file dialog to choose an image rather than type in absoulute path of the image.
e.g. edit fp/ fc/
|
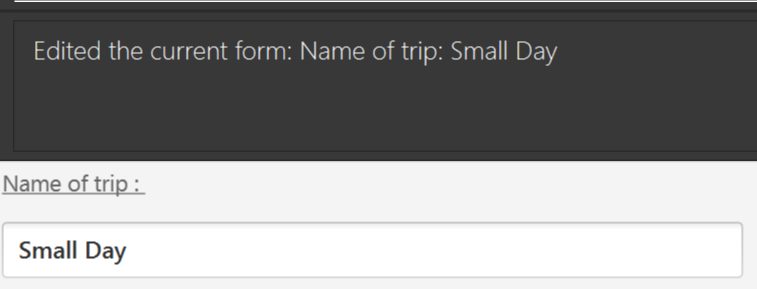
Below is an example execution of changing the name of an existing trip to "Small Trip":
-
Begin at the edit trip screen, the original name of the trip is the same as before.

-
Enter the command
edit n/Small Tripinto the command box and press enter to execute.
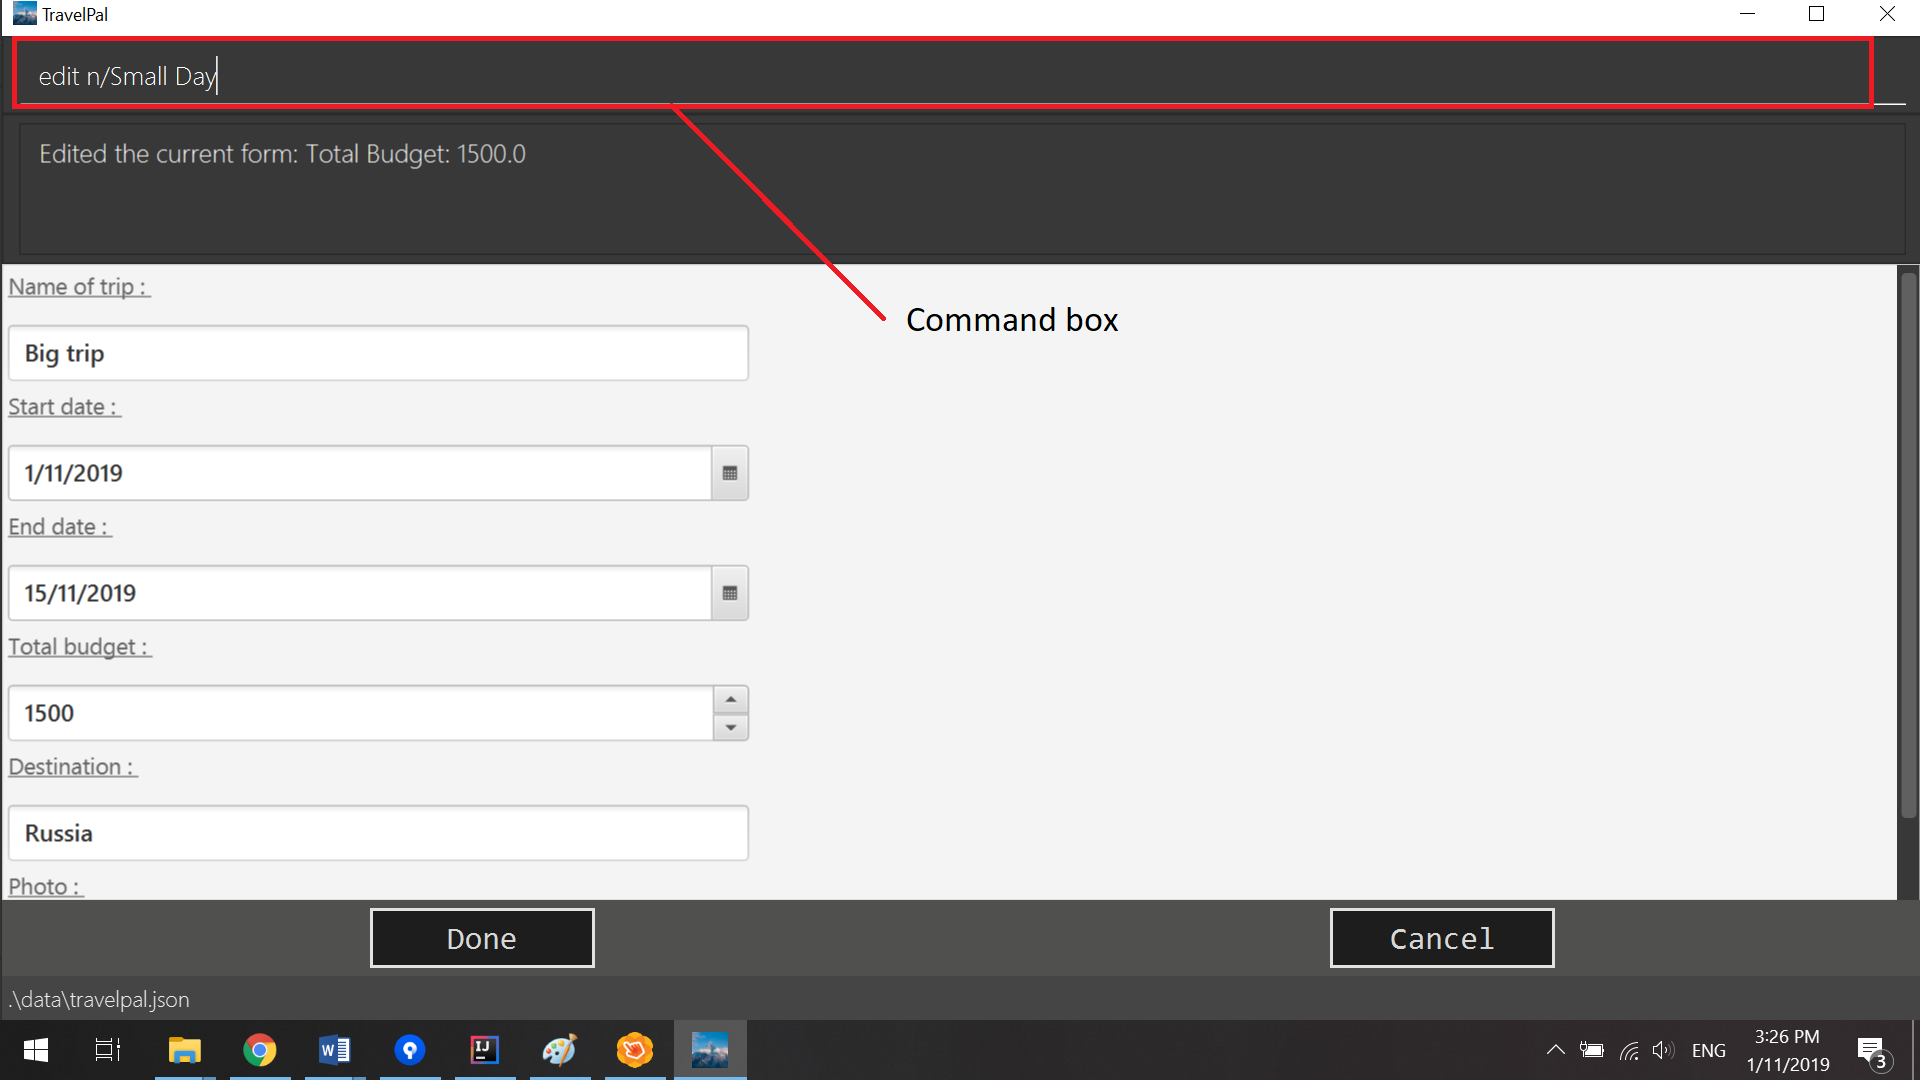
edit n/Small Trip-
The name of the trip is now "Small Trip"!
Step 4: Having completed editing the the form, you can submit it by executing the done command or the cancel command which will confirm your edit or discard it respectively.
You have successfully created/edited a trip!
Contrbutions to the Developer Guide
Below is an excerpt from our TravelPal developer guide authored by me. This section explains the execution of editing a Trip in TravelPal. It showcases my ability to write comprehensive technical documentation.
[Itinerary] Edit trip/day/event feature
Aspect: Logic
Editing of trip/day/event can be accessed from TripsPage/DaysPage/EventsPage respectively.
The execution of commands in the each page is facilitated by TripManagerParser/DayViewParser/EventViewParser which extends from the PageParser. This class serves as the abstraction for all parsers related to each Page.
The operations are exposed to the Model interface through the Model#getPageStatus()
method that returns the PageStatus containing the all information regarding the current state of application. This includes the descriptors (explained in Step 1 below) which stores all information about the edit.
Given below is an example usage scenario and how the program behaves at each step.
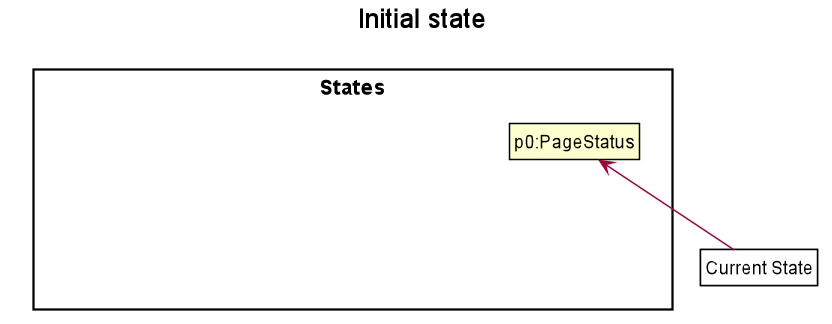
Step 1. When the user launches the application. The PageStatus is initialized under along with other Model components. PageStatus at launch does not contain any EditTripDescriptor/EditDayDescriptor/EditEventDescriptor responsible for storing information for the edit.
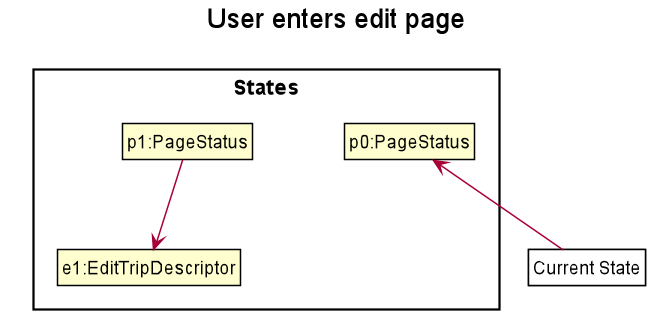
Step 2. The user currently on the TripsPage/DaysPage/EventsPage is displayed a list of Trip/Day/Event respectively. The user executes the edit command EDIT1 using the OneBasedIndex on the list to edit it.This executes the EnterEditTripFieldCommand/EnterEditDayFieldCommand/EnterEditEventFieldCommand that initializes a new descriptor within PageStatus before switching over to the EditTripPage/EditDayPage/EditEventPage containing to perform the editing.
Step 3. The user is now on the edit page displaying a list of fields that the user can edit in the Trip/Day/Event. Commands on each page differs based on the fields they contain.
The following is an example list of commands available in DaysPage and the execution of the program when a field is edited in DaysPage:
-
edit n/<name> ds/<startDate> de/<endDate> b/<totalBudget> l/<destination> d/<description>- Edits the relevant fields -
done- Completes the edit and returns to the Overall View -
cancel- Discards the edit and returns to the Overall View
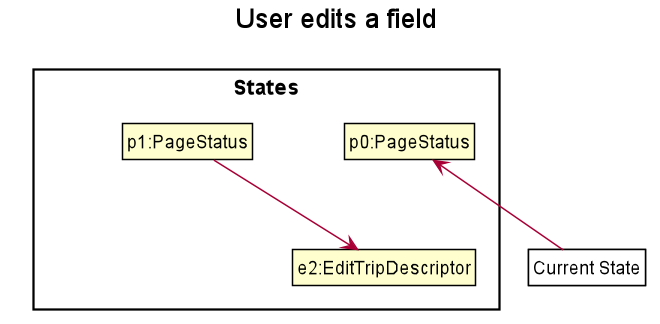
When user executes the command edit n/EditedName on the DaysPage. The command creates a new descriptor from the contents of the original, replacing the fields only if they are edited. The new descriptor is then assigned to PageStatus replacing the original EditDayDescriptor. The result of the edit is then displayed to the user.
Step 4. The user has completed editing the Trip/Day/Event and executes done/cancel to confirm/discard the edit. The execution of the two cases are as follows:
-
The user executes
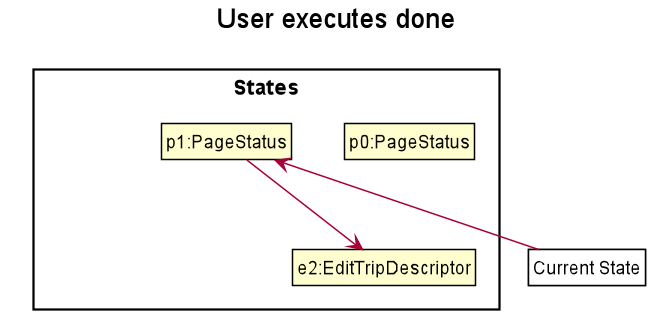
doneto confirm the edit. This executes theDoneEditTripCommand/DoneEditDayCommand/DoneEditEventCommandand aTrip/Day/Eventis built from the descriptor respective to the type it describes.DayList#set(target, edited)proceeds to be executed which accesses theDayto edit from thedayfield inPageStatusas the target. This method replaces the original day with the newly built day from the descriptor. The descriptor inPageStatusis then reset to contain empty fields (See figure below).
-
The User executes
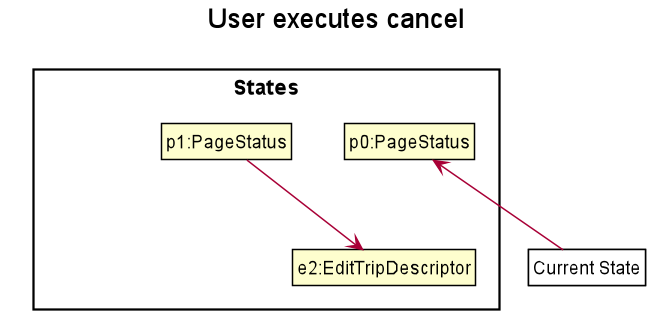
cancelto discard the edit. This executes theCancelEditTripCommand/CancelEditDayCommand/CancelEditEventCommandwhich resets the descriptor inPageStatusto contain all empty fields.
-
Upon completion of the edit, the user is returned to the
TripPage/DaysPage/EventsPagedepending on where the user entered the edit page from.
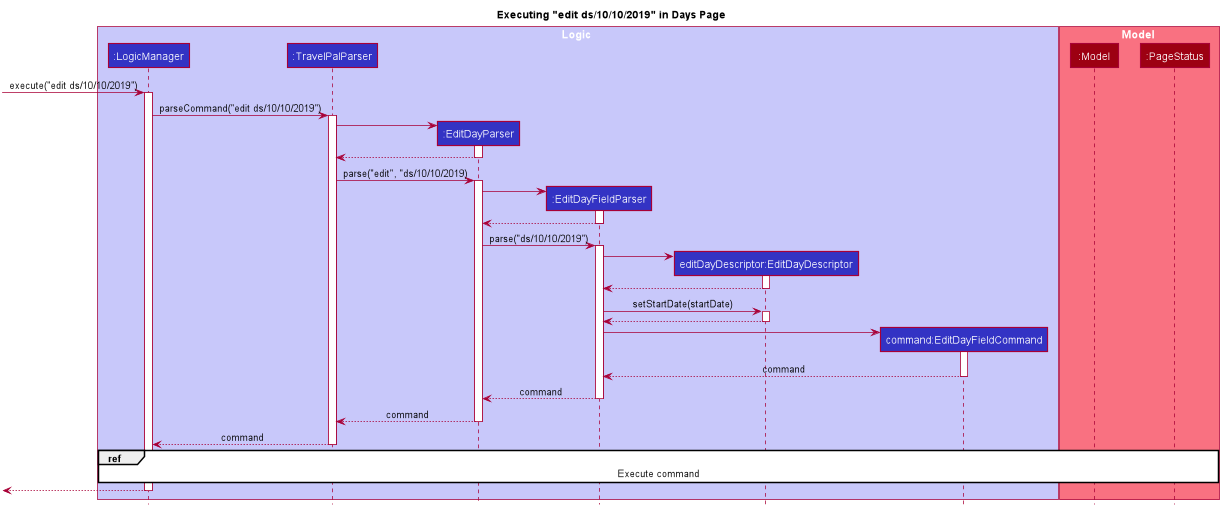
Below is a sequence diagram illustrating the execution of the command "edit ds/10/10/2019" on Days Page:
edit ds/10/10/2019-
When the command is executed, TravelPal uses a series of parsers to parse entire command
-
TravelPalParser: Parses the command. In execution above, it is identified that the first word is the command. -
EditDayParser: Parses the type of command. The string "edit" is parsed and correctly identifiesEditDayParsershould be used to continue parsing further tokens -
EditDayFieldParser: Parses the details of the edit. In this execution, the date is parsed by theDateParserUtilclass and creates a descriptor as mentioned in the section above
-
After executing the parsers above, the last parser instantiates and recursively returns the command (e.g. commandEditDayFieldCommand) up to the LogicManager. LogicManager then executes the command as the sequence diagram below:

The execution of the command is explained above (refer to Aspect: Logic).
Aspect: User Interface
The UI for to edit fields are associated with the EditTripPage/EditDayPage/EditEventPage respectively.
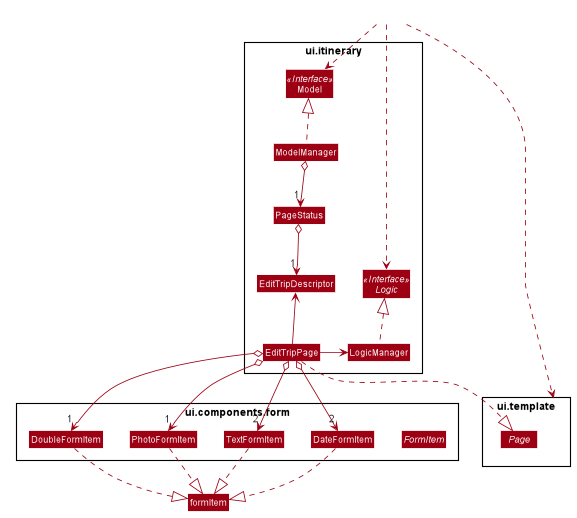
The execution of the edit command involves the Model, Logic and Ui components of the application. Listed here are the packages used in the execution of the edit commands that are found in the figure above:
-
ui.itinerary: This package contains all the Ui classes for the Itinerary feature.
-
ui.components.form: Contains all the form items
-
ui.template: This package contains the
Pageclass which all pages extend from
The class at large in the diagram above is the EditTripPage of the 3 pages explained. It extends from the Page class and is associated with the following:
-
Contains
formItemsfrom theui.components.formgenerate a form-
The
FormItems(e.g.DateFormItem) are instantiated by theEditTripPage#initFormWithModelmethod called by the constructor ofEditTripPage. EachFormItemcontains anexecuteChangeHandlerthat executes whenever theonChangeproperty is modified by the user. These are initialized as execution of the various edit commands (e.g. EditTripFieldCommand/EditDayFieldCommand/EditEventFieldCommand) using the value in theFormItem.
-
-
Navigable to the
ModelManagerandLogicManagerfor execution of commands using Ui interactions.
The contents of the fields are updated by the execution of the commands above. When the user edits any of the FormItems, the commands are executed which will cause the EditTripPage/EditDayPage/EditEventPage#fillPage() to execute again. fillPage retrieves the updated fields from PageStatus and displays them as the values in the FormItems.
Aspect: Workflow of execution
The logic of editing a field and committing it to memory is a simple process of validating each field. If any field fails to meet the specifications, the Trip/Day/Event will not be created/edited. Below is an example execution of validating the edit:
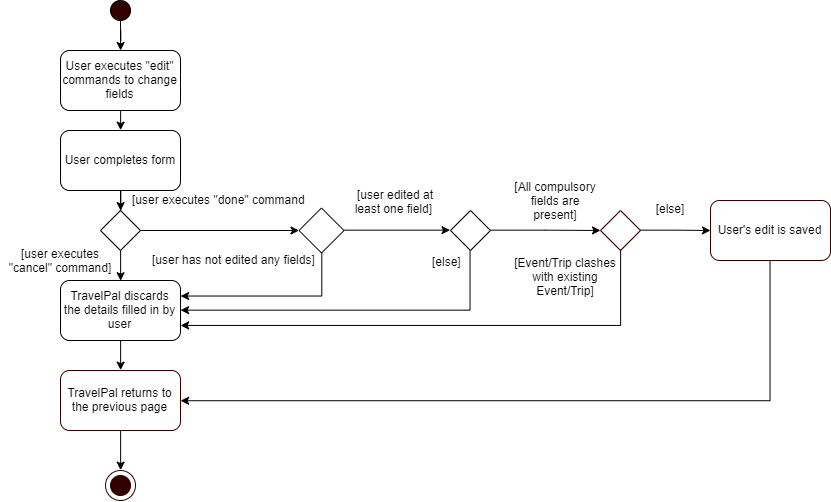
Aspect: Design considerations
When designing this feature, there were several challenges involved while working with the existing code base especially to adhere to strict Object Orientated Programming Principles. Below are two such design challenges that and how they were resolved:
| Challenge | Alternative 1 | Alternative 2 | Chosen Option |
|---|---|---|---|
Handling Dynamic UI Changes |
The first alternative was to consider the updating of ui as a state of the program. The |
The second alternative was to let pages that can change by execution of commands (dynamic pages) to extend the class |
Alternative 2 was chosen due better Object Orientated Programming (OOP) principles. The second method was good practice of the Interface Segregation Principle where classes do not need to depend on methods it did not need. Static pages in the program does not inherit However limitations of Java arose as classes cannot inherit more than one class at once. Instead of using the class |
Storing of the user’s edit information |
The first alternative was the straight forward implementation of using the |
The second alternative was using |
The second alternative was chose mainly due to the coherence to the design of using forms. The descriptors also serve as minor validations (e.g. Only alphanumeric characters, up to 40 characters etc.). Users can be informed earlier of mistakes in filling forms before submitting. |